Calendar
The Calendar gives you a real-time visual overview of all bookings, blocked times, and resource availability across your activities. View your schedule in Daily, Weekly, or Monthly format, configure how the grid looks, and navigate to any date with a single click.
Quick start
Get started with the Calendar in just a few steps:
- Navigate to Calendar in the left sidebar
- Select an activity from the dropdown (e.g., "Archery", "Bowling Lane 2")
- Choose a view: Daily, Weekly, or Monthly
- Use the ‹ Today › navigation arrows or the date picker icon to jump to a specific date
Note: Only active activities appear in the activity dropdown.
What you can do
The Calendar helps you:
- See all bookings at a glance — View bookings plotted across lanes/targets with customer names and booking-type colours
- Switch between views — Toggle between Daily (timeline or list), Weekly, and Monthly views based on how much detail you need
- Spot blocked time — Greyed-out hatched slots show where block rules are applied, so you know what's unavailable at a glance
- Move bookings quickly — In Daily Timeline view, drag and drop a booking card to a new time slot or lane without opening the booking
- Configure the grid — Adjust start/end time, time interval, cell height, and column width to match your workflow
- Navigate quickly — Jump to any date using the inline date picker or the Previous/Next arrows
How it works
Overview
The Calendar page is the central hub for monitoring daily activity. When you open it, the last-used settings (activity, view, date, and grid mode) are automatically remembered from your last visit. If it's your first visit or you're using a private/incognito window, the calendar defaults to the first available activity, today's date, Daily view, and Timeline mode.
Bookings appear as colour-coded event cards positioned on the correct lane/column and time slot. Block rules render as hatched grey overlays covering the affected targets and time range. The Configure Daily Calendar panel lets you fine-tune how the grid is drawn — changes take effect immediately as a live preview but must be saved to persist.
Key concepts
Activity
The resource you are managing (e.g., "Archery", "Bowling Lane 2"). Each activity has a set number of units (lanes, courts, targets) shown as columns in Daily timeline view.
Views
Three display modes:
- Daily — A vertical timeline or grouped list for a single date
- Weekly — A 7-column time grid (Sun–Sat) for the current week
- Monthly — A full month grid with booking-count badges and colour dots per day
Block Rules
Rules configured elsewhere in the system that restrict booking availability for specific dates, days, time ranges, or target counts. On the calendar these show as hatched grey overlays.
Calendar Config (local)
Per-browser settings (start time, end time, time interval, cell height, cell min width) saved in your browser. Switching to a different browser, device, or private window resets to the defaults.
Account-Level Calendar Settings
Start time, end time, and time interval can also be saved at the account level via Account > Settings and Preferences > General Settings. These act as the default for all users at the location.
Understanding the interface
Toolbar
The toolbar sits above the calendar grid and contains all primary controls.
| Control | Description |
|---|---|
| Activity dropdown | Select the activity to view. The dropdown lists all active activities for the location. |
| Daily / Weekly / Monthly | Switches the calendar view. The active view is highlighted. |
| Timeline / List | (Daily view only) Switches between the timeline grid and the grouped list layout. |
| Configure Daily Calendar | Opens the configuration panel on the right side of the page (Daily view only). |
| Refresh | Reloads bookings and block rules for the current activity and date. |
| Date label + date-picker icon | Shows the current date (Daily), week range (Weekly), or month/year (Monthly). Click the calendar icon to open the date picker popup. |
Daily view — Timeline mode
The default view when you first open the Calendar. Displays a vertical grid where:
- Rows represent time slots (based on the configured time interval)
- Columns represent individual lanes / courts / targets for the selected activity
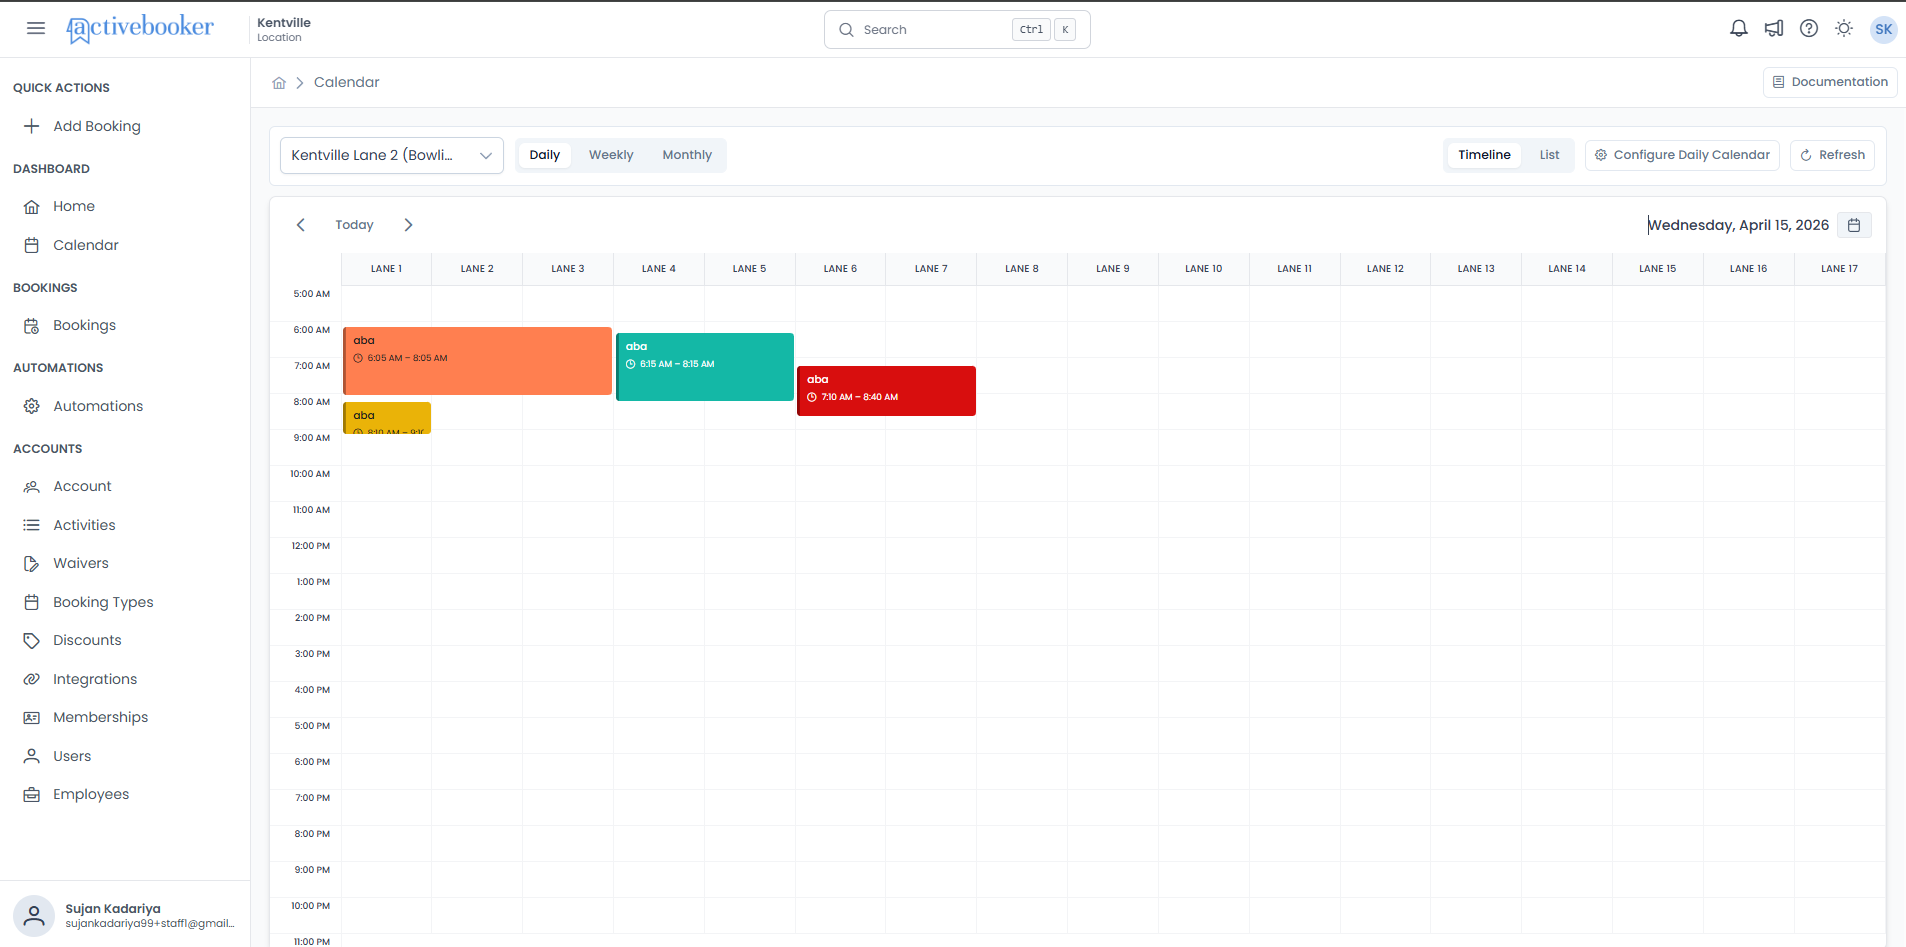
Bookings appear as colour-coded cards showing:
- Customer name (or booking type label)
- Start and end time (e.g., "6:05 AM – 8:05 AM")
Block rules appear as hatched grey overlays with a label describing the rule (e.g., "block day may 29").
Time alignment: If a booking starts at 6:10 AM but the grid segments are 6:00 AM and 6:30 AM, the event card auto-adjusts to its accurate position between segments. Bookings outside the configured start/end time range are not shown.
Daily view — List mode
Switch to List mode using the toggle in the top right. Instead of a grid, bookings are shown as grouped cards organised by time range.
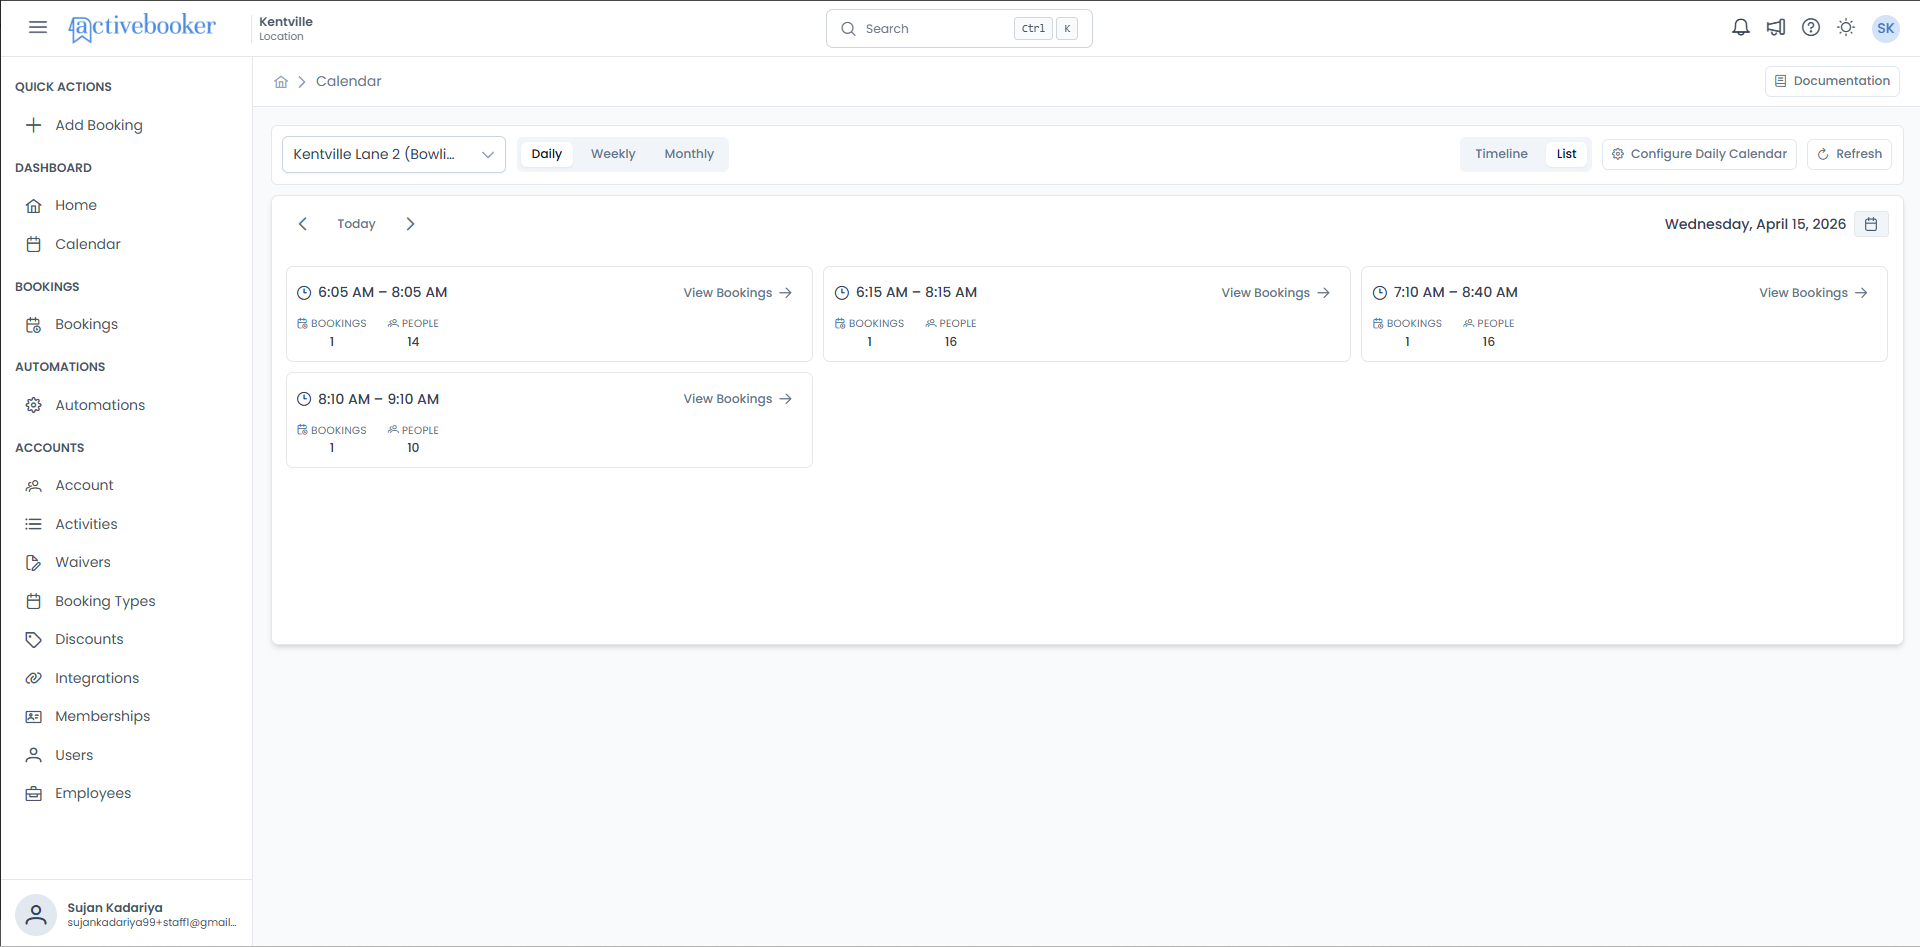
Each card gives you a summary of that time slot's activity:
- Time range (e.g., "6:05 AM – 8:05 AM") — the start and end of the session
- Bookings count — total number of bookings in that slot
- People count — total number of people across those bookings
- View Bookings → link — click to open the full list of individual bookings for that time slot
List mode is a useful alternative to the timeline when you want a quick, uncluttered summary of the day's activity without the spatial lane-by-lane detail.
Weekly view
The Weekly view shows a 7-column grid (Sunday through Saturday) with a time axis on the left. Bookings appear as colour-coded event blocks on the correct day column.
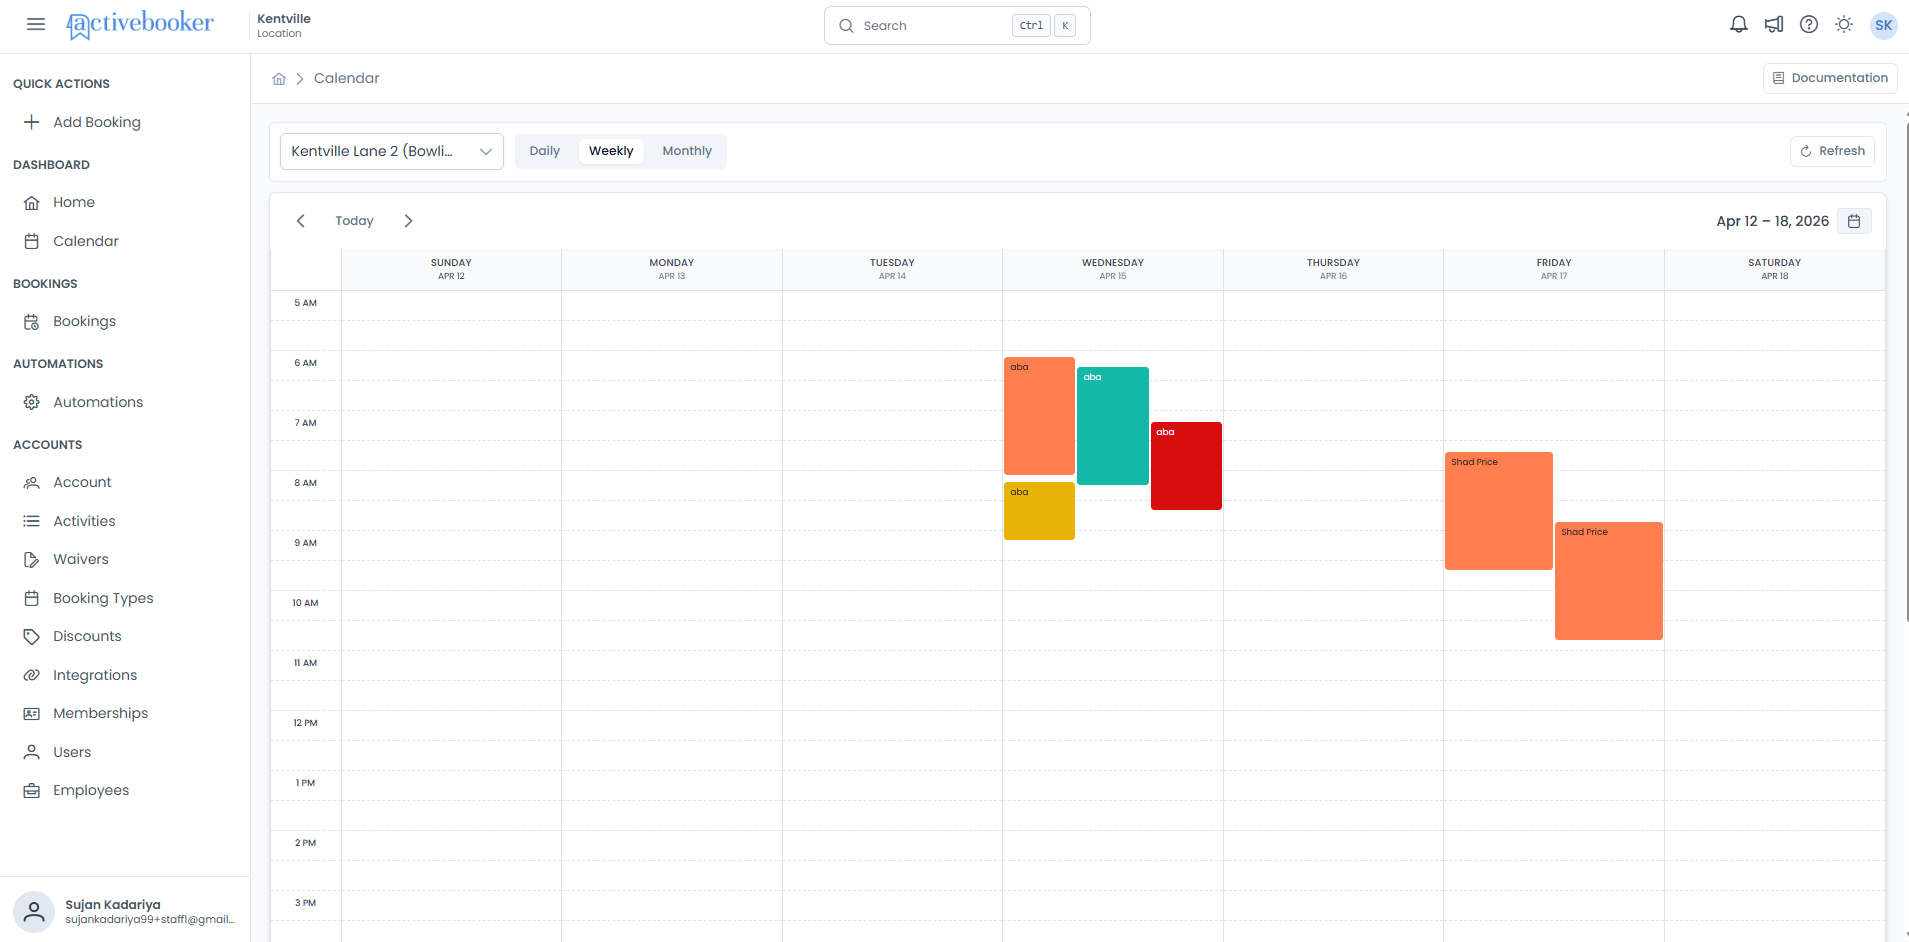
- Toolbar label shows the week range (e.g., "Apr 12 – 18, 2026")
- Clicking any booking event navigates to the booking detail page
- Clicking a day cell switches to Daily view for that date
- A tooltip on each event shows customer name, booking type, people count, and channel
Monthly view
The Monthly view shows a full calendar grid for the selected month. Each day cell can contain:
- A blue badge with the total booking count for the day
- Colour dots representing the booking types scheduled that day
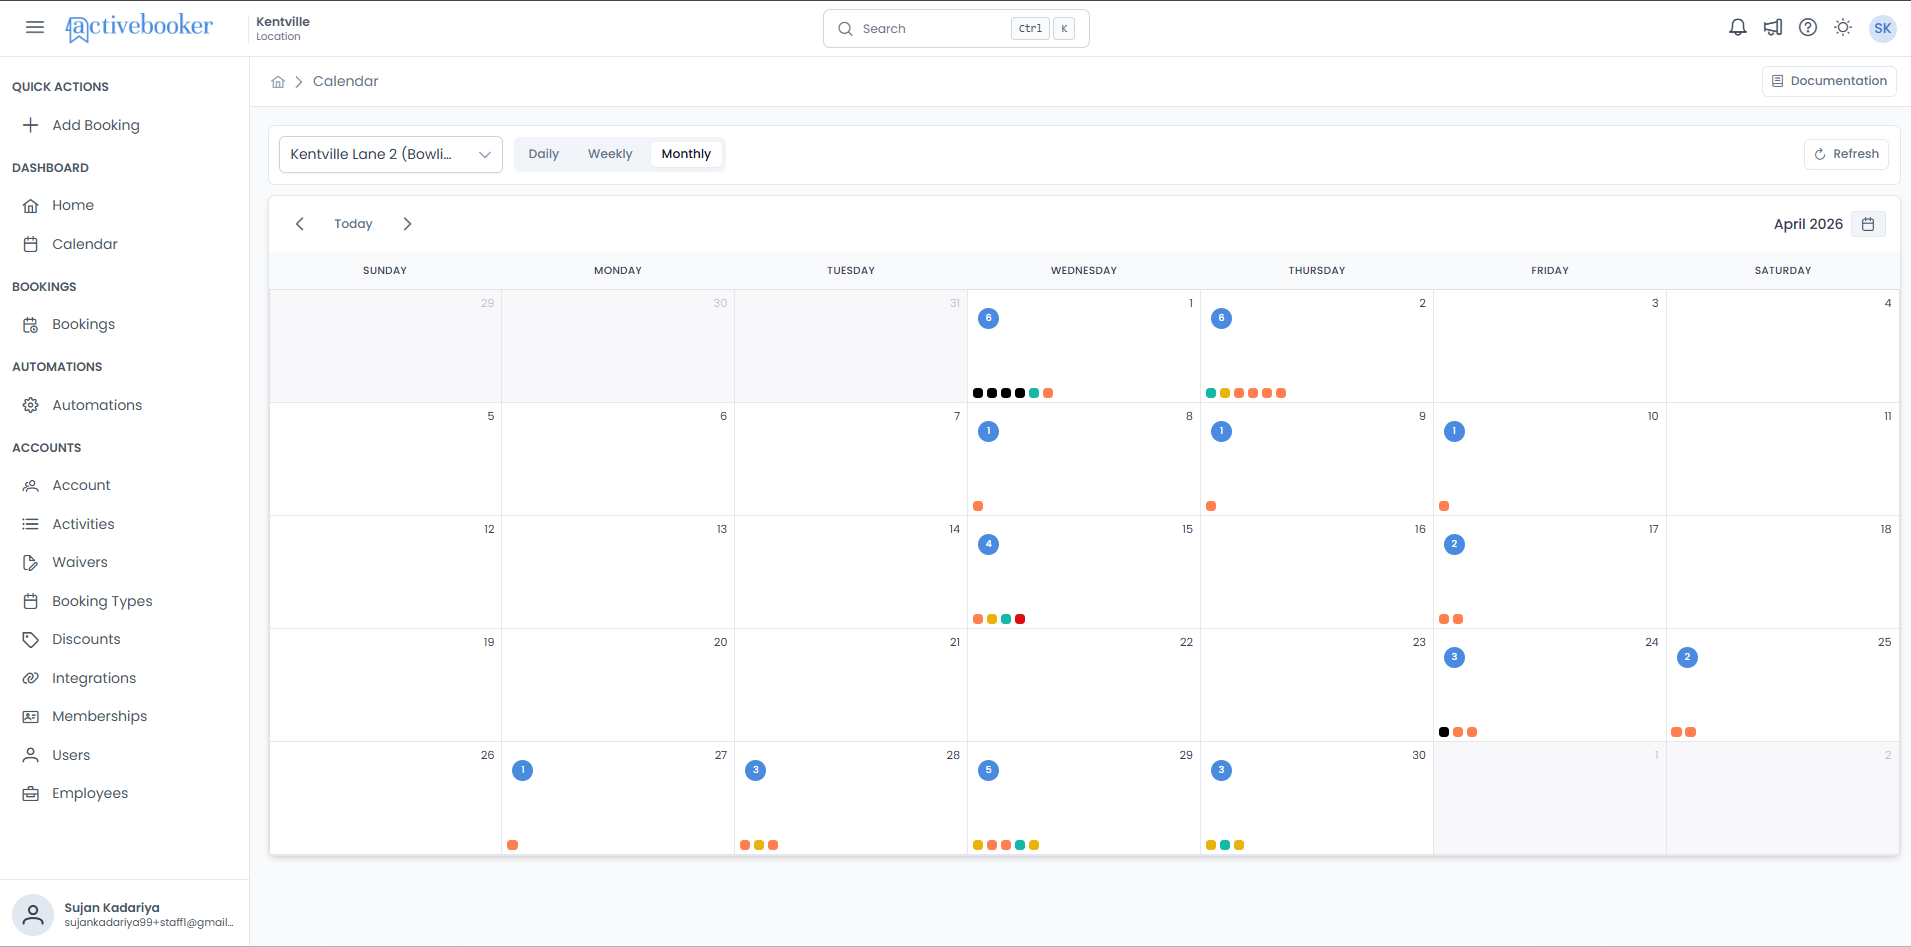
- Toolbar label shows the month and year (e.g., "April 2026")
- Clicking a day switches to Daily view for that date
- Days with no bookings show no badge or dots
- Greyed-out date numbers (at the edges of the grid) belong to the previous or next month
Tooltips
Hovering over a booking card in the Daily (timeline), Weekly, and Monthly views displays a tooltip with key details about that booking.
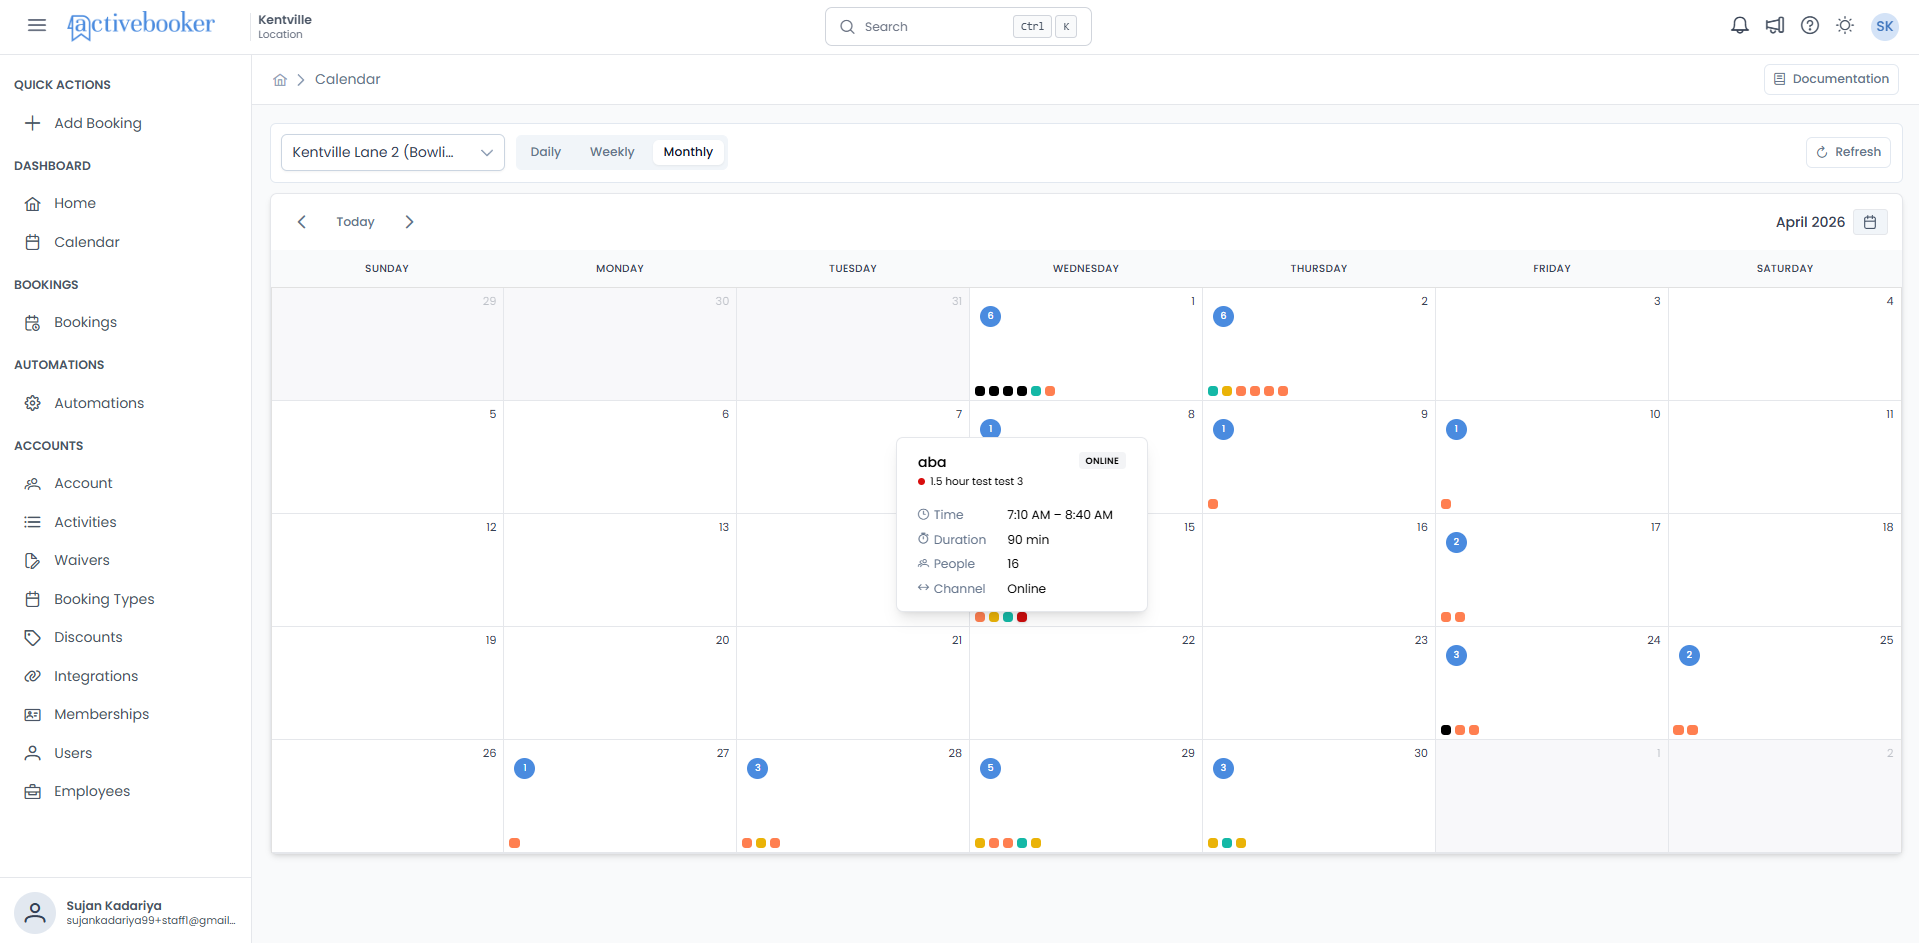
The tooltip typically includes:
- Customer name — the person who made the booking
- Booking type — the type of session or activity booked
- Time — start and end time of the booking
- Duration — total length of the booking in minutes
- People — number of people included in the booking
- Channel — how the booking was made (e.g., Walkin, Online)
Note: The exact information shown may vary slightly across the Daily, Weekly, and Monthly views depending on the booking type.
Date picker
Click the calendar icon in the top-right corner of the toolbar to open the date picker popup.

| Element | Behaviour |
|---|---|
| Month/Year header | Shows the current month. Use ‹ and › arrows to navigate months. |
| Day grid | All dates for the month. Previous/next-month dates appear muted. |
| Today's date | Highlighted in light blue. |
| Selected date | Highlighted in blue when different from today. |
| Selecting a date | Closes the popup and updates the calendar view to the selected date. |
Configure Daily Calendar panel
Click Configure Daily Calendar in the toolbar (Daily view only) to open the configuration panel on the right side of the page.
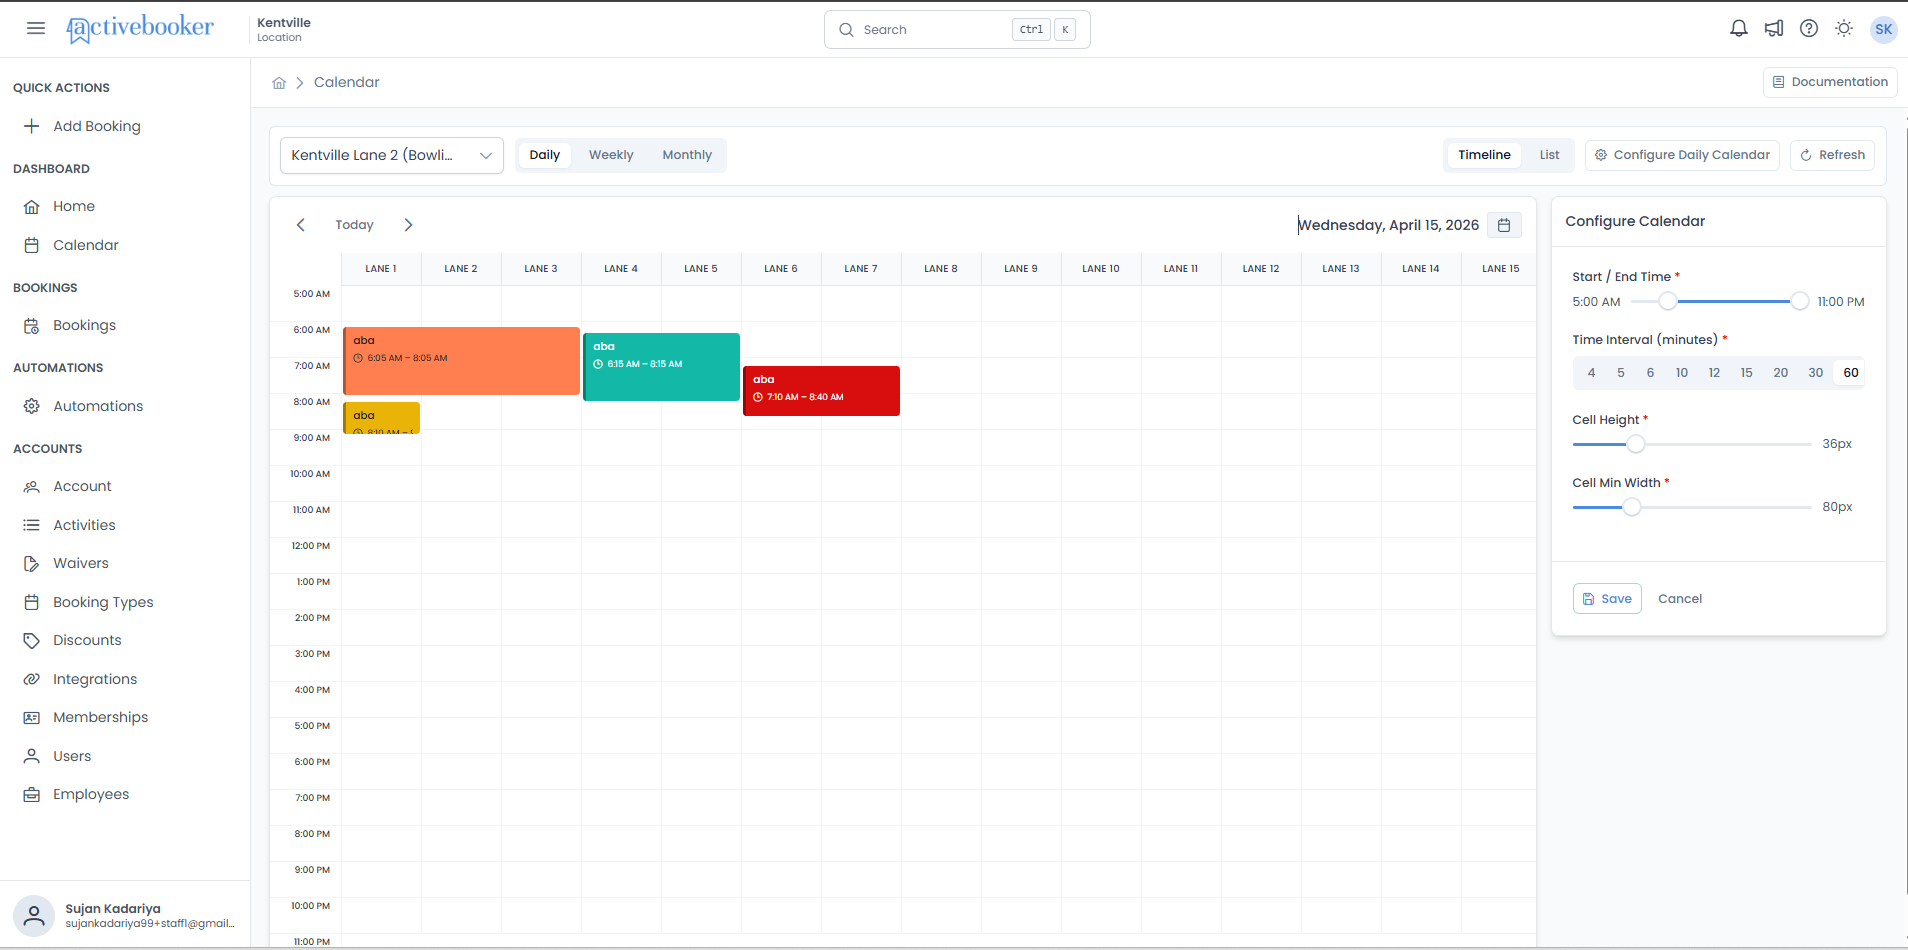
Step 1 — Set the time range and interval
Use these controls to define the visible time window and how the daily grid is divided:
| Setting | Description |
|---|---|
| Start / End Time | A dual-handle range slider. Drag the handles to set the visible time range on the daily grid. Changes preview live. |
| Time Interval (minutes) | Select-buttons with 9 options: 4, 5, 6, 10, 12, 15, 20, 30, 60. Controls how many rows appear per hour (e.g., selecting 15 shows 4 rows/hour; selecting 60 shows 1 row/hour). Changes preview live. |
Step 2 — Adjust the grid cell size
Use these controls to fine-tune how the grid cells appear on screen:
| Setting | Description |
|---|---|
| Cell Height | Slider controlling the height of each time-slot row. Changes preview live. |
| Cell Min Width | Slider controlling the minimum width of each lane/target column. Changes preview live. |
Save — Saves your configuration for this browser. The grid immediately reflects your settings.
Cancel — Discards any unsaved changes and reverts to the last saved configuration.
Note: These settings are saved in your browser. Opening the Calendar in a different browser, device, or private window will show the default values until you configure and save again.
Navigation
Previous / Next arrows
Use ‹ and › to move through time:
| View | What one click does |
|---|---|
| Daily | Moves forward or backward by 1 day |
| Weekly | Moves forward or backward by 1 week |
| Monthly | Moves forward or backward by 1 month |
Today button
Click Today to instantly return to the current date regardless of where you've navigated.
Switching views
Switching between Daily, Weekly, and Monthly preserves:
- The selected activity
- The current date (the new view centres on the date you were viewing)
Block rules on the calendar
Block rules are created outside the Calendar (in activity/booking-type settings) and are rendered automatically on the Daily timeline.
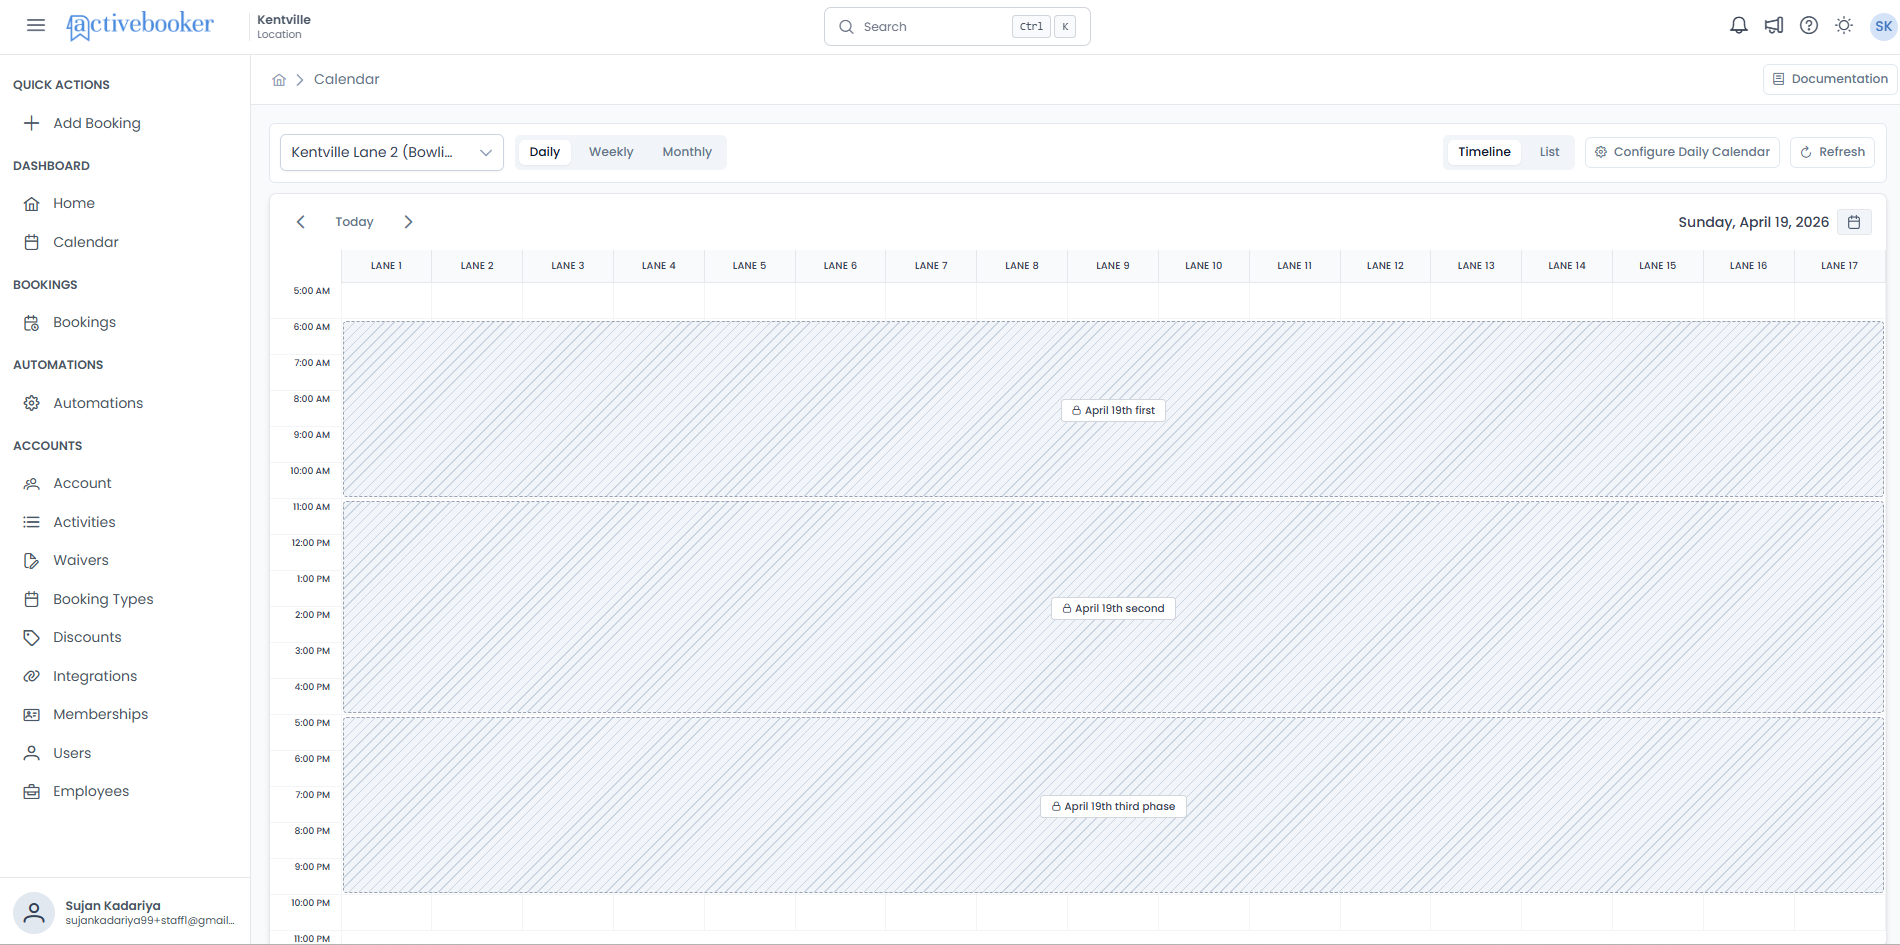
| Block rule type | How it appears on the calendar |
|---|---|
| All-day block (all targets) | Entire day hatched grey across all columns |
| All-day block (partial targets) | Entire day hatched grey on specified columns only; remaining columns unaffected |
| Time-range block | Hatched grey only for the specified start–end time window |
| Lane/target restriction | Hatched grey limited to the specified column range (e.g., lanes 2–4 only) |
A Block Rule label inside the blocked area identifies the rule. For example, "Blocked-Fixed Date (18th April)-All Day-Block Targets(6)" indicates a fixed-date block applied all day to 6 targets.
Moving a booking
In the Daily Timeline view, you can move a booking to a different time slot or lane by dragging its card and dropping it onto the new position — no need to open the booking.
How to move a booking
- Make sure you are in Daily view with Timeline mode selected.
- Locate the booking card you want to move.
- Click and hold the booking card — it will enter a moveable state.
- Drag the card to the new time slot and lane you want.
- Release the card to drop it in the new position.
If the move is successful, a confirmation message appears at the top of the screen:
Booking Moved — Booking has been moved successfully.
The booking card will appear in its new position straight away.
What changes
When you move a booking, only the start time, end time, and Units (Example: lane / court / target) are updated. All other booking details remain exactly as they were.
When a move is not allowed
Not every slot is a valid destination. The calendar will prevent the move and show a message to let you know why.
Moving to a blocked slot
If you drop a booking onto a slot that is blocked (shown with a grey diagonal stripe pattern), the move will be rejected and an error message appears:
Cannot Move — Cannot move into a blocked time slot.
The booking stays at its original position.
Moving to a slot that is already taken
If the destination slot already has another booking, a pop-up dialog will appear:
Booking Move Failed — This booking cannot be moved. The selected time slot is already taken.
Click Close to dismiss the dialog. The booking stays at its original position and the existing booking in that slot is not affected.
Moving too close to midnight
If dropping the booking at the chosen time would cause it to run past midnight, a pop-up dialog will appear:
Booking Move Failed — The move would extend the booking past midnight. Please choose an earlier time slot.
Click Close and try a different, earlier time slot.
Moving past the activity's operating hours
If the booking's end time would fall outside the activity's configured closing time, the move will be rejected and an error message appears:
Cannot Move — Event would extend past operating hours.
The booking stays at its original position.
Tip: Blocked slots are easy to spot — they appear with a grey diagonal stripe pattern. Empty, bookable slots have a plain white background. If you are unsure whether a slot is available, check its appearance before dragging.
Account Settings — Calendar defaults
In addition to the per-browser config panel, account-level calendar defaults can be set in Account > Settings and Preferences > General Settings.
| Setting | Description |
|---|---|
| Calendar Time Interval (minutes) | Sets the default time interval for all users. Options: 4, 5, 6, 10, 12, 15, 20, 30, 60. Previously saved value is pre-selected when the modal reopens. |
| Calendar Start Time | The default start time shown on the daily grid. |
| Calendar End Time | Must be strictly after the selected Start Time. Dynamically updates when Start Time changes. If Start Time moves past the current End Time, End Time auto-resets to the first valid option. 12:00 AM (Midnight) is always a valid End Time. |
Tip: Start time, end time, and interval are synchronised — the last-saved value from either Account Settings or the Calendar Config panel is shown in both places.
Best practices
✓ Configure your grid before your shift starts — Set start/end time and interval to match your operating hours so you only see relevant time slots
✓ Use Daily timeline for operational decisions — It gives the most detail about which lanes are free or blocked
✓ Use Monthly view for a capacity overview — Quickly spot busy and quiet days at a glance
✓ Refresh after making changes — If you or a colleague updates a booking or block rule, click Refresh to make sure you're seeing the latest data
✓ Save your config — Changes in the Configure panel preview live but won't persist until you click Save