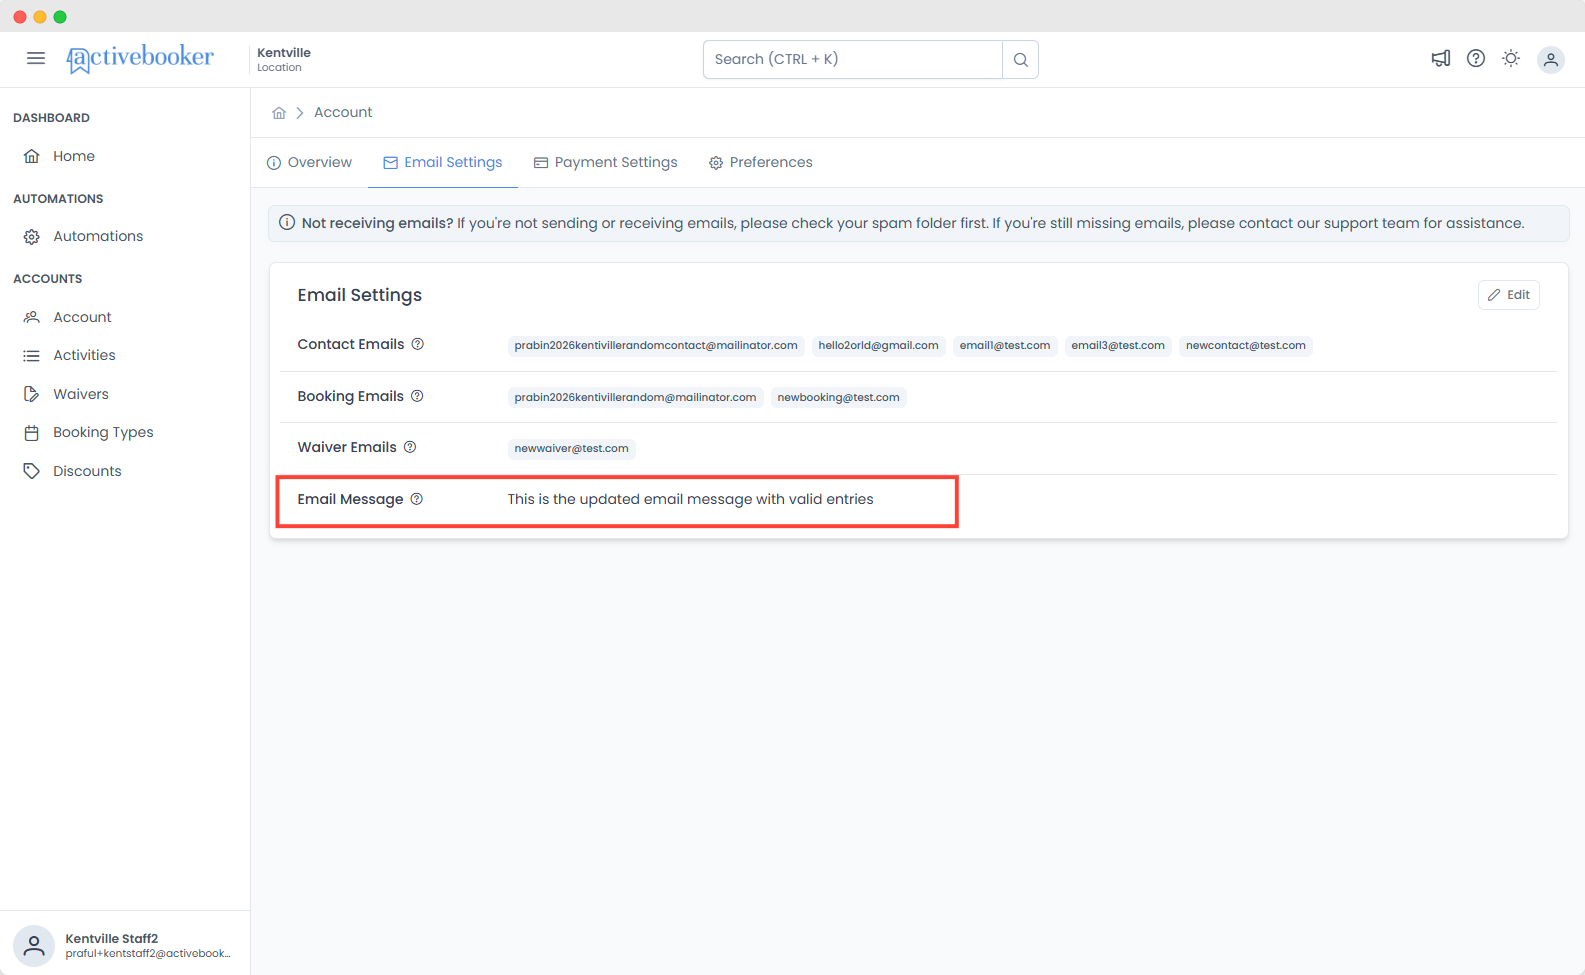
Email Settings
Configure Email Addresses for Customer Communications and Notifications
The Email Settings page allows you to manage all email addresses used throughout your booking system. Configure where customer communications are sent, who receives booking notifications, and set up custom email messages for consistent communication with your customers.
Email Categories Overview
The Email Settings page is organized into four main categories, each serving a specific purpose in your booking workflow:
- Contact Emails: Display to customers on your booking site and in communications
- Booking Emails: Receive notifications when new bookings are created
- Waiver Emails: Receive notifications when waivers are submitted
- Email Message: Store reusable content to insert into email templates
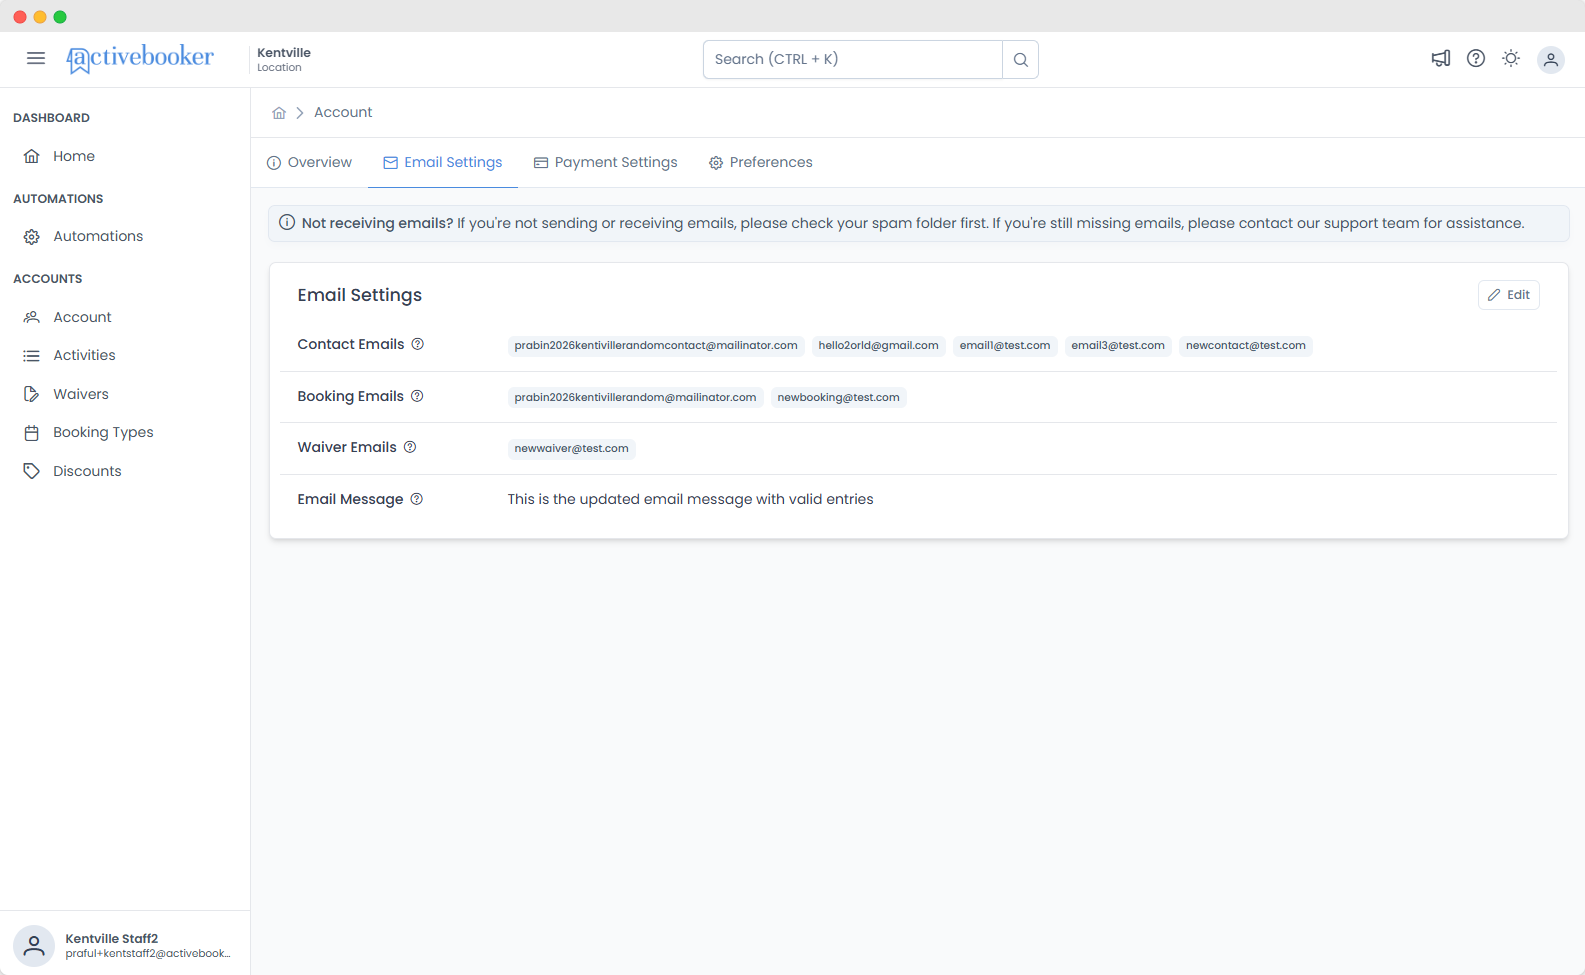
If you're not sending or receiving emails, check your spam folder first. If you're still missing emails, contact the support team for assistance.
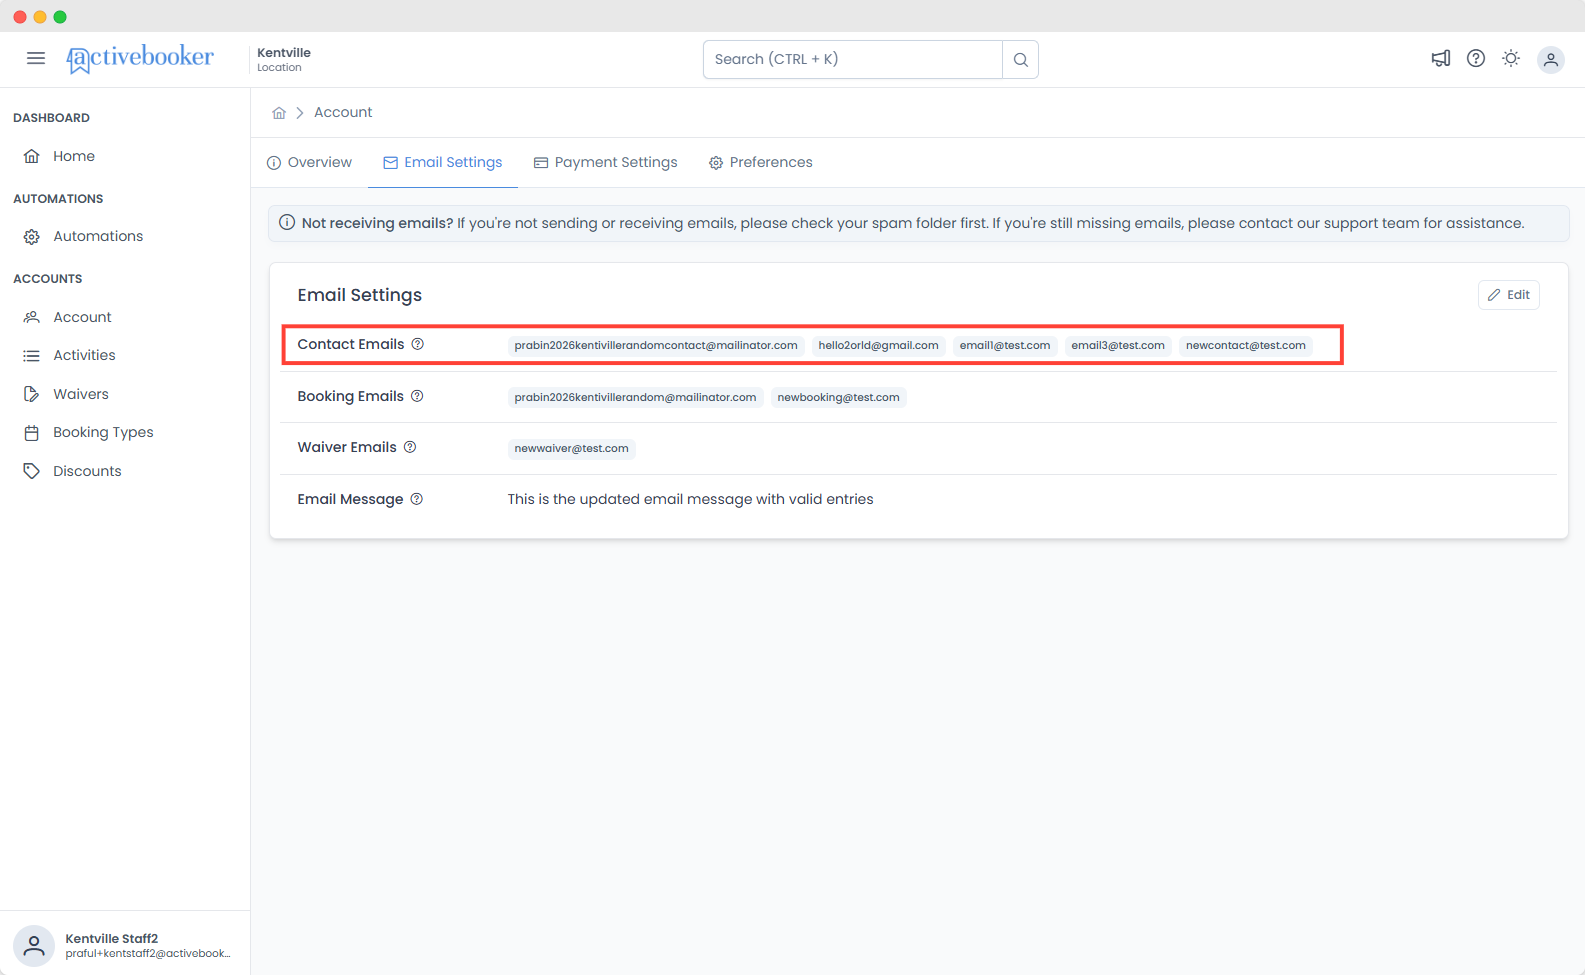
Contact Emails
Contact emails are customer-facing email addresses that appear throughout your booking system.
Where Contact Emails Appear
- On your public booking site
- In customer communications and confirmations
- In various customer touchpoints where your business email is displayed
Contact Email Behavior
- First email priority: When only one email address is required, the system uses the first email address in the list
- Multiple email usage: All contact emails may be displayed in locations that support multiple addresses
- Customer visibility: These emails are visible to customers, so use professional business email addresses
Requirements
- Status: Required (at least one email must be provided)
- Maximum: 5 email addresses per category
- Validation: Must be valid email format (validated server-side)
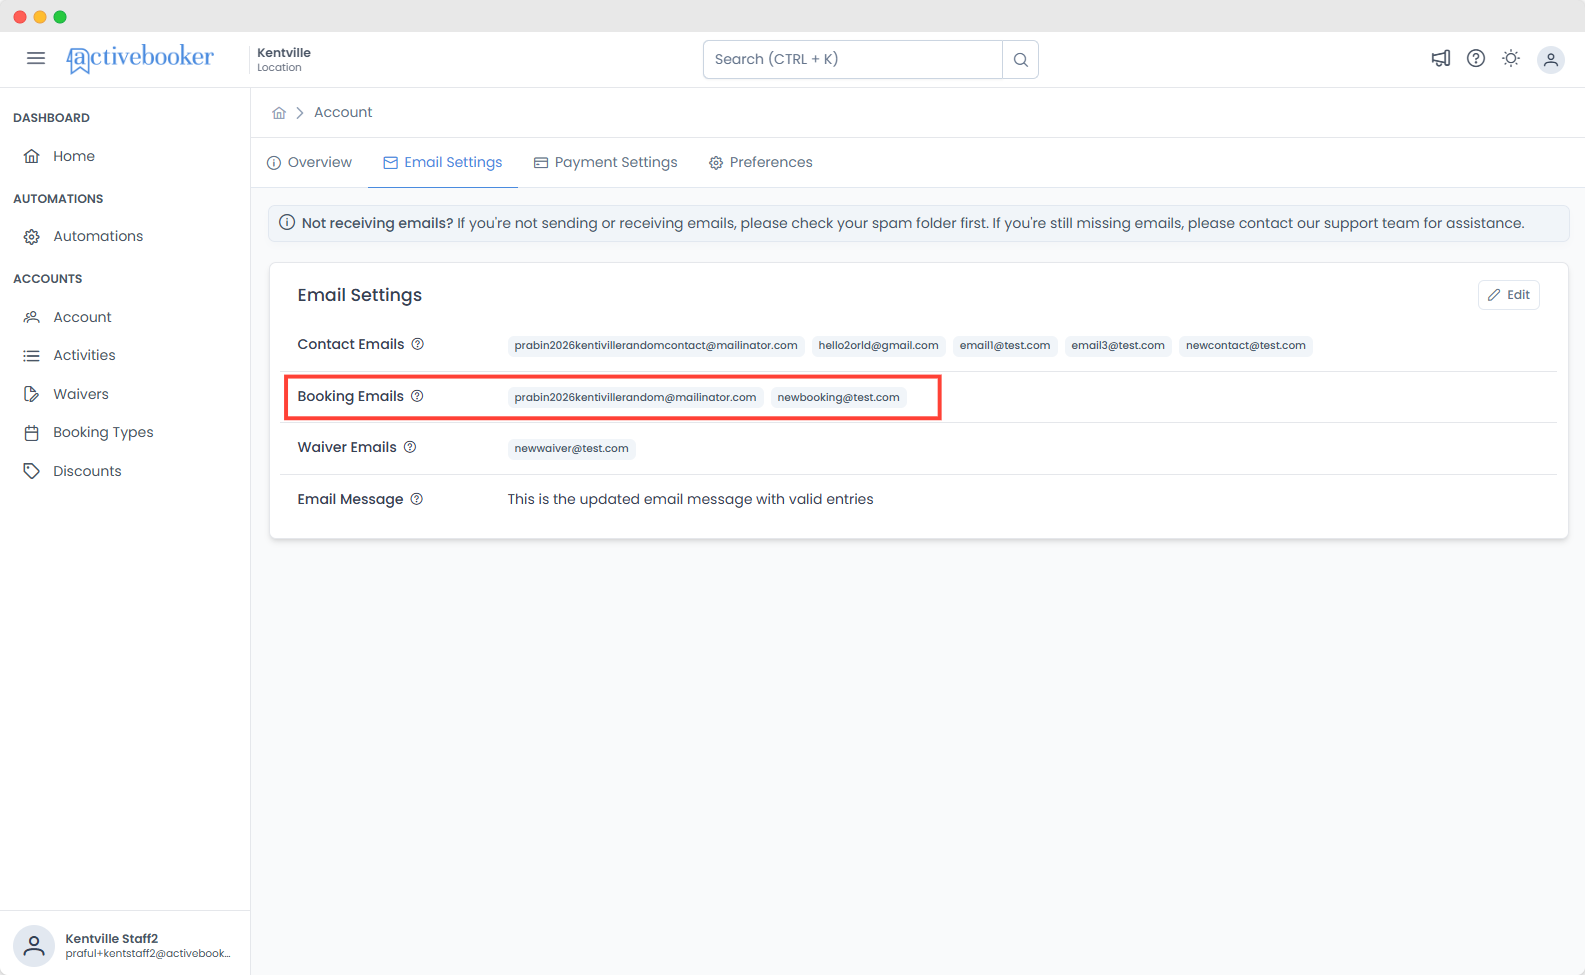
Booking Emails
Booking emails receive automatic notifications whenever a booking is created, modified, or cancelled.
What Booking Emails Receive
All email addresses listed in this category will receive:
- New booking notifications
- Booking modification alerts
- Booking cancellation notices
- Real-time updates on booking activity
Use Cases
Add booking emails for:
- Staff members who manage bookings
- Managers who need booking oversight
- Departments responsible for customer service
- Administrative personnel handling scheduling
Requirements
- Status: Required (at least one email must be provided)
- Maximum: 5 email addresses per category
- Validation: Must be valid email format (validated server-side)
- Delivery: All listed emails receive notifications simultaneously
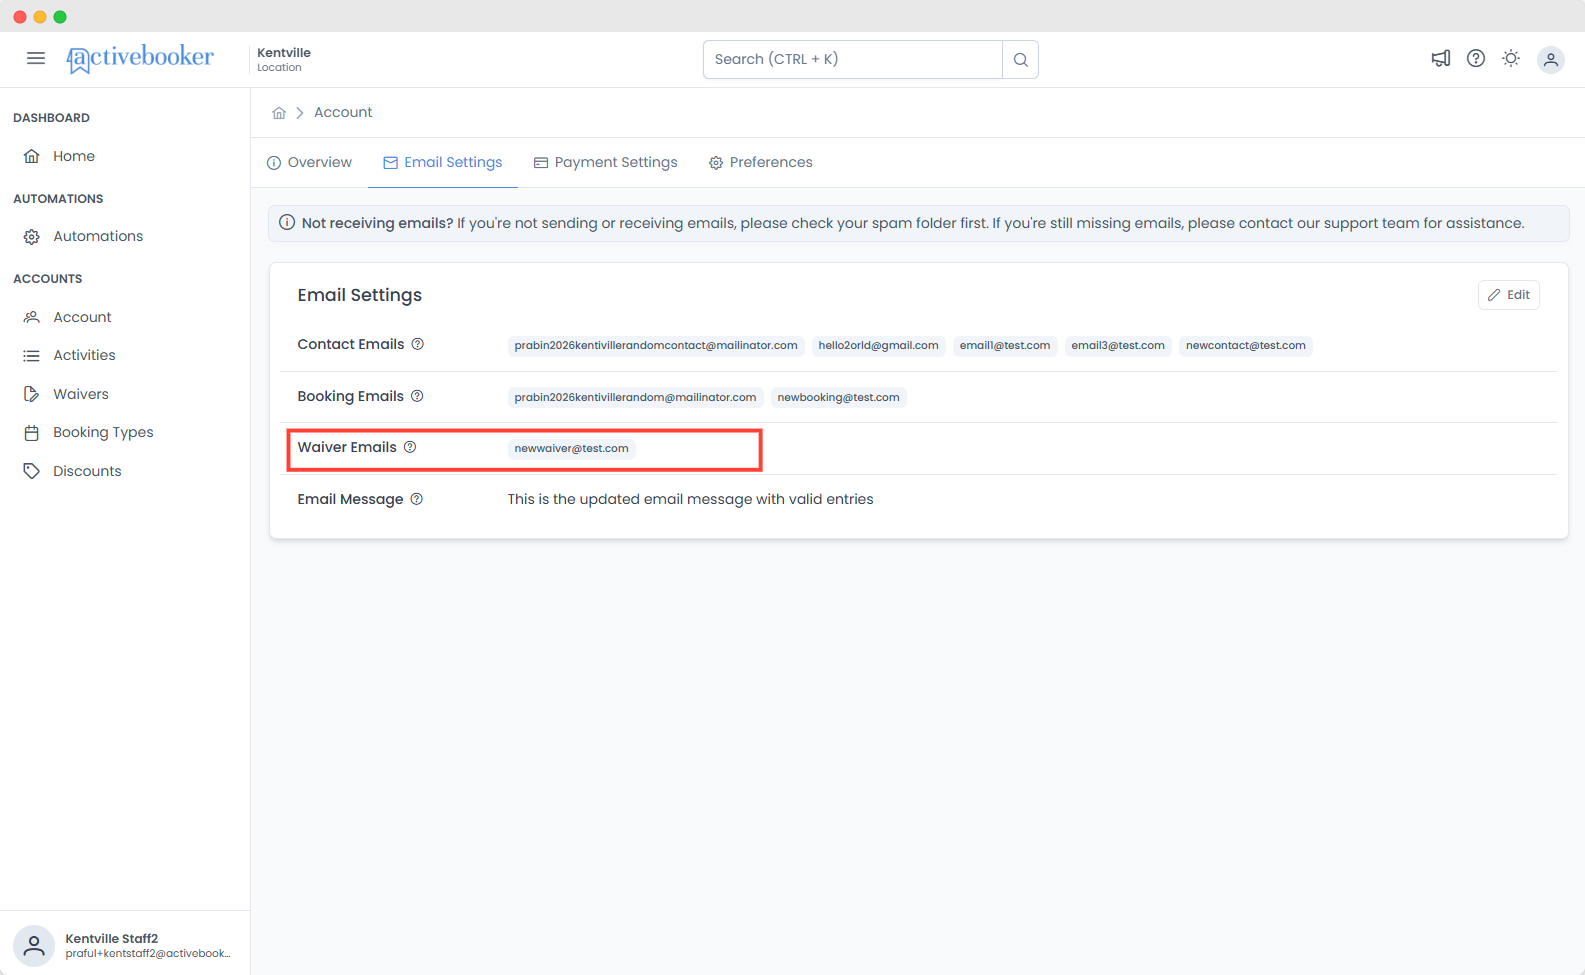
Waiver Emails
Waiver emails receive notifications when customers submit waivers through your booking system.
What Waiver Emails Receive
All email addresses listed in this category will receive:
- Waiver submission notifications
- Copies of submitted waiver information
- Alerts when new waivers are completed
Use Cases
Add waiver emails for:
- Legal or compliance departments
- Risk management personnel
- Staff who need to review waivers
- Administrators managing customer documentation
Requirements
- Status: Optional (not required for system operation)
- Maximum: 5 email addresses per category
- Validation: Must be valid email format (validated server-side)
- Delivery: All listed emails receive waiver notifications simultaneously
Only add email addresses for personnel who need to review waivers. Too many notifications can lead to important information being overlooked.
Email Message
The Email Message field allows you to store reusable content that can be inserted into various email templates throughout the system.
What Is Email Message Used For?
Email Message serves as a centralized storage location for:
- Standard disclaimers or legal text
- Company policies or terms
- Common instructions for customers
- Frequently used promotional content
- Signature blocks or footer information
How to Use Email Message
- Enter your reusable content in the Email Message field
- Save the email settings
- Insert the content into email templates using tokens or merge fields
- The content will be automatically populated when emails are sent
The Email Message content is not automatically added to emails. You must manually insert it into email templates using the appropriate token or merge field where you want it to appear.
Requirements
- Status: Optional
- Format: Plain text
- Length: No specified limit (use reasonable length for email content)
- Usage: Must be manually added to email templates via tokens/merge fields
How to Edit Email Settings
Opening the Edit Modal
- Navigate to Account > Email Settings tab
- Click the Edit button in the top-right corner of the Email Settings section
- The "Edit Email Settings" modal will open with all email categories

Adding Email Addresses
To add an email address to any category:
- Click inside the desired email field (Contact, Booking, or Waiver Emails)
- Type the complete email address
- Press Enter or Tab on your keyboard
- The email address will convert into a chip (pill-shaped tag)
- Repeat to add up to 5 email addresses per category
Press Enter after typing an email address to quickly add it and continue entering more addresses.
Removing Email Addresses
To remove an email address:
- Locate the email chip you want to remove
- Click the X icon on the right side of the email chip
- The email address will be removed immediately
Editing the Email Message
- Click inside the "Email Message" text area
- Type or paste your reusable content
- Format the text as needed
- The content will be saved when you click Save
Saving Your Changes
- After making all desired changes, click the Save button at the bottom of the modal
- Your changes will be applied immediately across the system
- Click Cancel to discard changes and close the modal without saving
Email Validation and Limits
Email Format Validation
The system validates all email addresses to ensure they are properly formatted:
- Must contain an @ symbol
- Must have a valid domain (e.g., example.com)
- Must follow standard email format conventions
- Server-side validation ensures data integrity
If you enter an invalid email address, the system will reject it during the save process. Ensure all email addresses are correctly formatted before saving.
Email Quantity Limits
Each email category has specific limits:
| Email Category | Required | Maximum Addresses | Notes |
|---|---|---|---|
| Contact Emails | Yes | 5 | First email used when only one is needed |
| Booking Emails | Yes | 5 | All addresses receive booking notifications |
| Waiver Emails | No | 5 | All addresses receive waiver notifications |
Why These Limits Exist
- Performance: Limits prevent system slowdown from excessive email sending
- Relevance: Ensures only necessary personnel receive notifications
- Manageability: Keeps email lists organized and maintainable
If you need more than 5 email addresses per category, consider:
- Creating email distribution lists (e.g., bookings@yourcompany.com that forwards to multiple people)
- Using team inbox solutions
- Contacting support to discuss enterprise options
Understanding Help Icons
Throughout the Email Settings page, you'll see help icons (ℹ️) next to field labels. These icons provide:
- Quick explanations of what each field does
- Context about how emails are used
- Tips for best practices
- Important notes about email behavior
How to use help icons:
- Hover over or click the help icon (ℹ️)
- Read the tooltip or popup that appears
- Use the information to better understand the field's purpose
Best Practices
Contact Emails
- Use professional business email addresses
- List your primary customer service email first
- Ensure all emails are monitored regularly
- Use email addresses customers can reply to
Booking Emails
- Include all team members who need real-time booking updates
- Consider time zones when adding staff emails
- Use dedicated booking management emails for busy locations
- Regularly review who needs these notifications
Waiver Emails
- Only include personnel who must review waivers
- Consider legal/compliance team members
- Add management personnel for oversight
- Remove inactive staff members promptly
Email Message
- Keep content concise and relevant
- Update regularly to reflect current policies
- Test the message in email templates before using in production
- Include appropriate contact information if needed
FAQs
Q: What happens if I don't add any Contact Emails?
Contact Emails are required. The system will not allow you to save settings without at least one valid contact email address. This ensures customers always have a way to reach your business.
Q: Will all Booking Emails receive every single booking notification?
Yes, all email addresses listed in the Booking Emails category will receive notifications for every booking event (new bookings, modifications, cancellations). This ensures all relevant team members stay informed.
Q: Can I use the same email address in multiple categories?
Yes, you can use the same email address across different categories. For example, you might use your main business email as both a Contact Email and Booking Email. However, this means that email will receive notifications from all categories where it's listed.
Q: How do I stop receiving Booking Email notifications?
To stop receiving booking notifications:
- Navigate to Account > Email Settings
- Click Edit
- Remove your email address from the Booking Emails field by clicking the X on your email chip
- Click Save
Q: What's the difference between Contact Emails and Booking Emails?
- Contact Emails: Customer-facing emails displayed on your booking site and in communications. These are "public" contact points for customers.
- Booking Emails: Internal notification emails that receive alerts when bookings occur. These are for staff/management and are not shown to customers.
Q: Can I leave Waiver Emails empty?
Yes, Waiver Emails are optional. If you don't use waivers in your booking process or don't need email notifications for waiver submissions, you can leave this field empty.
Q: How do I insert the Email Message into my email templates?
The Email Message content must be manually inserted into email templates using tokens or merge fields. The exact process depends on your email template editor:
- Navigate to your email template settings
- Locate the merge field or token for "Email Message"
- Insert the token where you want the content to appear
- The stored Email Message will be automatically populated when emails are sent
Consult the Email Templates documentation for specific instructions on using tokens.
Q: Why did my email address turn into a chip/pill after I pressed Enter?
This is the intended behavior. The chip format (pill-shaped tag) makes it easy to:
- Visually distinguish individual email addresses
- Quickly remove specific addresses by clicking the X
- See all addresses at a glance
- Prevent accidental editing of saved addresses
Q: Can I add email addresses with special characters or international domains?
The system supports standard email formats including:
- International domains (.co.uk, .com.au, etc.)
- Subdomains (name@mail.company.com)
- Hyphens and numbers in domains
However, the email must follow RFC 5322 standards. If you're unsure whether an email format is valid, try adding it—the system will validate it during the save process.
Q: What happens if an email address becomes invalid after I save it?
If an email address becomes invalid (domain expires, mailbox is disabled, etc.):
- The system will continue trying to send emails to that address
- You may receive delivery failure notifications
- Update or remove the invalid email address as soon as possible
- Check your email settings regularly to ensure all addresses are active
Q: Can I reorder the email addresses in each category?
Currently, email addresses appear in the order they were added. The first email address in the Contact Emails category is used in locations where only one email is needed. If you need to change the order:
- Remove all email addresses
- Re-add them in your desired order
Q: Will changing these settings affect past bookings or emails?
No, changing email settings only affects future communications:
- Past emails already sent will not be changed
- New notifications will be sent to the updated email addresses
- Existing bookings are not affected
- Changes take effect immediately for new bookings and events
Troubleshooting
Email Addresses Won't Save
If your email addresses aren't saving:
Check email format
- Ensure proper format: name@domain.com
- No spaces before or after the email address
- No special characters except @ . - and _
Verify required fields
- Contact Emails must have at least one address
- Booking Emails must have at least one address
Check quantity limits
- Each category allows maximum 5 addresses
- Remove some addresses if you're at the limit
Browser issues
- Clear browser cache and try again
- Try a different browser
- Check your internet connection
Not Receiving Booking Notifications
If you're not receiving booking notifications:
- Verify email address: Check that your email is correctly entered in Booking Emails
- Check spam folder: Booking notifications may be filtered as spam
- Whitelist sender: Add the system's sending address to your safe senders list
- Test booking: Create a test booking to verify notifications are working
- Contact support: If issues persist, reach out to support with booking details
Waiver Notifications Not Arriving
If waiver notifications aren't being received:
- Verify Waiver Emails: Ensure email addresses are added to the Waiver Emails field
- Check spam/junk folders: Waiver notifications may be filtered
- Confirm waiver submission: Verify that waivers are being submitted through the system
- Review waiver settings: Check that waiver features are enabled for your account
- Contact support: Provide specific examples of missing notifications