Employees
Keep track of your team members and see who is registering new members. The Employees feature lets you add, manage, and assign employees to members, so you always know which staff member brought in each new sign-up.
Quick start
Get started with Employees in just a few steps:
- Navigate to Employees in the left sidebar under the ACCOUNTS section
- Click + Add Employee to create a new employee record
- Fill in the employee's name and (optionally) their email address
- Click Save — the system automatically generates a unique Employee Code
What you can do
The Employees feature helps you:
- Build your team roster — Add all staff members who interact with customers so they're available across the system
- Track member registrations — See which employee registered each member, helping you measure individual performance
- Reward top performers — Use employee-member data to identify who is bringing in the most sign-ups and recognize their efforts
- Maintain accurate records — Edit employee details, change their status, or remove them when they leave your team
How it works
Overview
Employees are the people who work at your location, your front desk staff, sales team, trainers, or anyone involved in day-to-day operations. Once you add employees to the system, they become available as a selectable option when registering new members.
When a member is registered with an employee assigned, that connection is saved permanently. This lets you look back and see exactly who brought in each member useful for performance reviews, incentive programs, and team management.
Key concepts
Employee Code
A unique identifier automatically created by the system when you add a new employee. The code follows the format EMPyymmdd-XXXXX (for example, "EMP260409-BA856"). You do not need to enter this, it is generated for you.
Employee Status (Active / Inactive)
Controls whether an employee appears in dropdown menus when registering or editing members. Active employees are available for selection. Inactive employees are hidden from dropdowns but their historical assignments remain intact.
Employee–Member Assignment
The link between an employee and a member. When you register a new member and select an employee, that assignment is recorded. If the employee is later deleted, the member's detail page will show "Employee no longer exists" instead of the employee's name.
Understanding the interface
Employee list page
When you open the Employees page, the breadcrumb at the top shows Home > Employees. The page is organized into three areas:
Top bar
- A Search keyword field on the left for finding employees quickly
- Refresh and + Add Employee buttons on the right
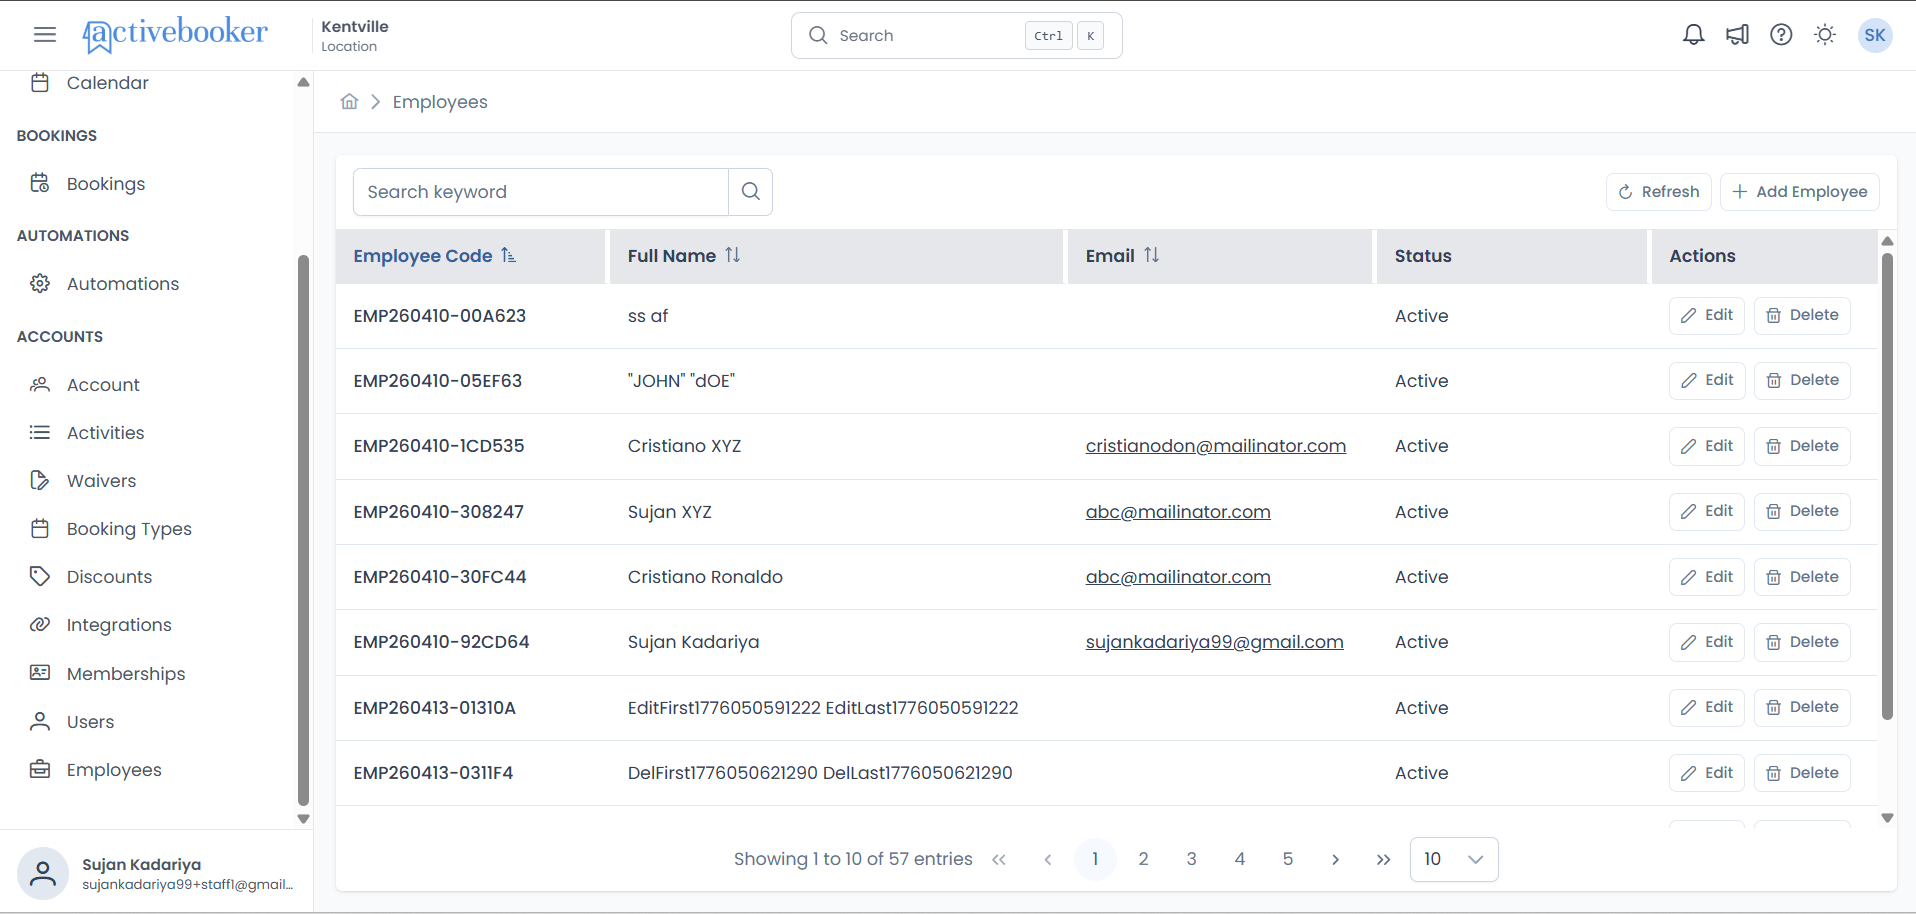
Employees table
The table shows the following information for each employee:
| Column | What it shows |
|---|---|
| Employee Code | The auto-generated unique identifier (e.g., "EMP260409-BA856"). You can click the column header to sort. |
| Full Name | The employee's first and last name. Sorted alphabetically (A–Z) by default. You can click the column header to sort. |
| The employee's email address, shown as a clickable link. You can also sort by this column. This field may be empty if no email was provided. | |
| Status | Whether the employee is Active or Inactive. |
| Actions | Buttons to Edit or Delete the employee. |
Pagination
At the bottom of the table, you'll see:
- How many employees are shown (e.g., "Showing 1 to 6 of 6 entries")
- Navigation arrows to move between pages
- An option to change how many employees are displayed per page (defaults to 10)
If no employees have been added yet, the table shows the message "There are no entries to display." with "Showing 0 to 0 of 0 entries".
Searching and sorting
Search
Type a keyword into the Search keyword field to instantly filter the employees table. You can search by:
- Employee Code — Type a full or partial code (e.g., "EMP260" or "EMP260409-BA856")
- Name — Type a first name, last name, or part of a name (e.g., "Cris" or "Ronaldo")
- Email — Type a full or partial email address (e.g., "cristiano" or "abc@mailinator.com")
Results update as you type. If no employees match your search, the table shows "There are no entries to display." Clear the search field to see all employees again.
Sort
- By default, employees are sorted by Full Name in alphabetical order (A → Z)
- Click the Employee Code, Full Name, or Email column header to change the sort column and toggle between ascending and descending order
- Only one column can be sorted at a time
Refresh
Click the Refresh button to reload the employees list with the most up-to-date information.
Adding an employee
- Click the + Add Employee button
- A pop-up form appears with the following fields
- Fill in the required fields (see below)
- Click Save to create the employee, or Cancel to close without saving

Form fields
First Name
The employee's first name.
Last Name
The employee's last name. Together with the first name, this forms the Full Name displayed in the employees list and in member dropdowns.
Email Address
The employee's email address. This is for your reference only, the system does not send any emails to this address. Standard email format is required if provided (e.g., "name@example.com").
Is Active
Controls whether this employee is available for selection when registering or editing members.
After saving, the system automatically generates a unique Employee Code for the new employee.
Editing an employee
- Click the Edit button (pencil icon) next to the employee you want to update
- The form opens with the employee's current details already filled in
- Make your changes to any field
- Click Save to apply, or Cancel to close without saving
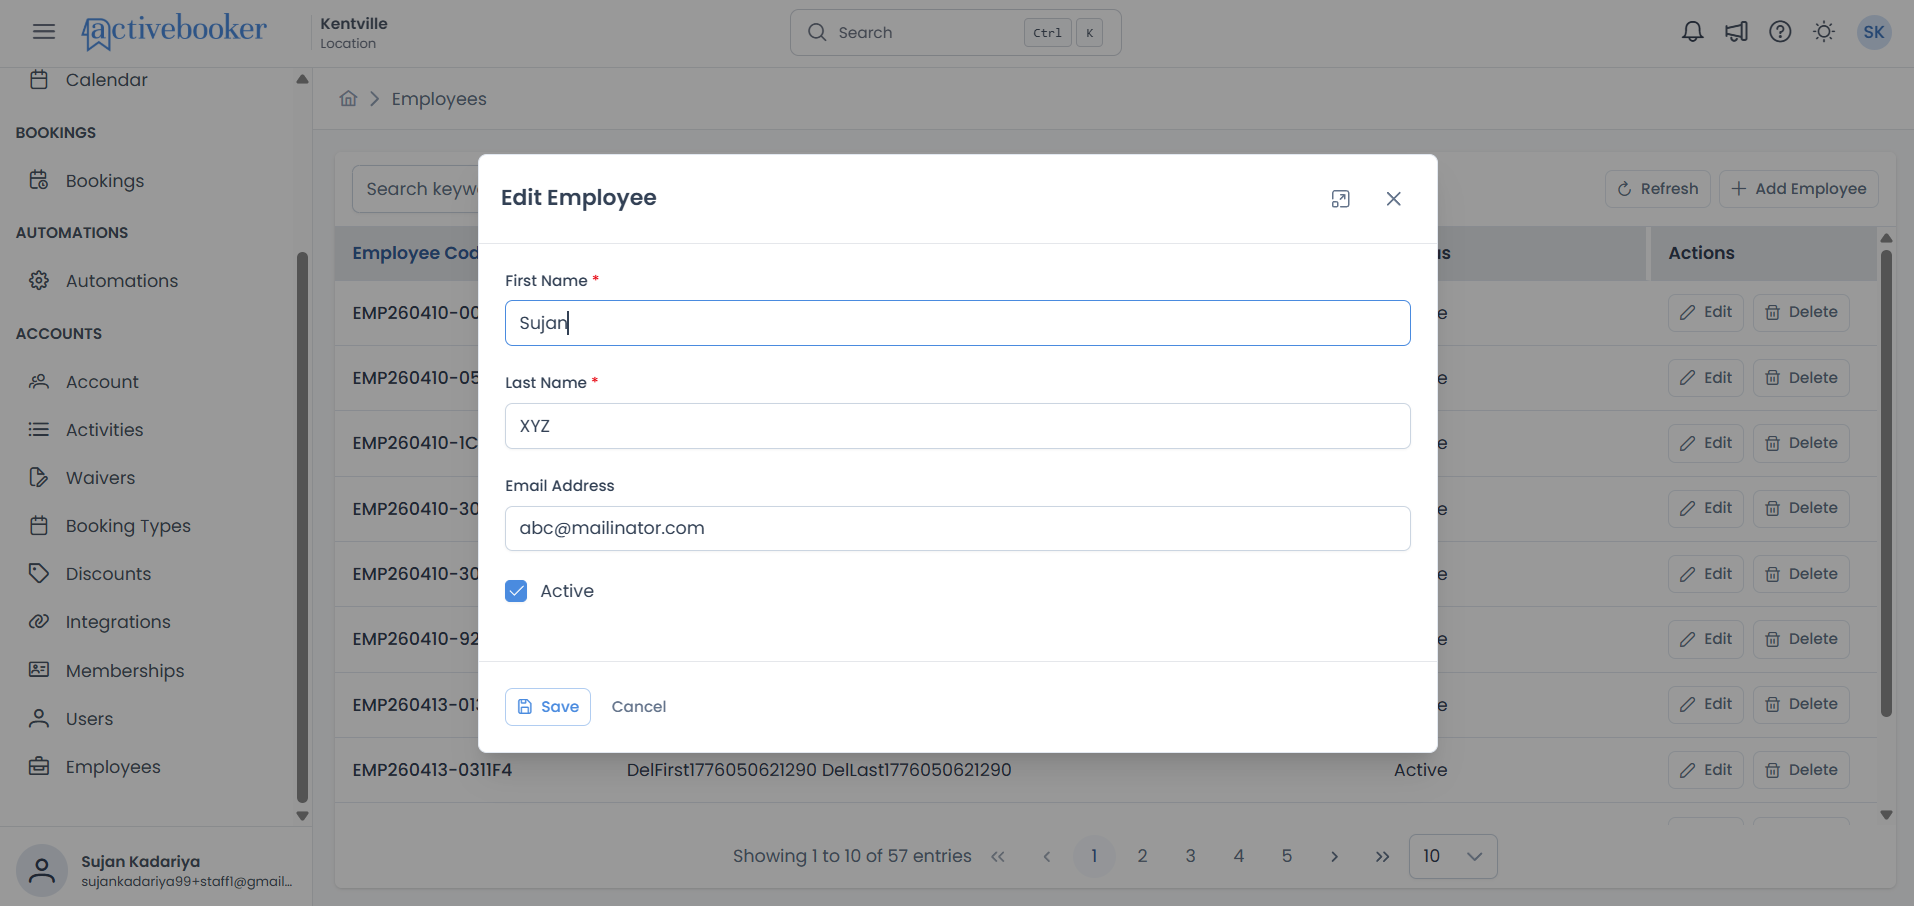
The same fields and requirements from the Add Employee form apply when editing. The Employee Code cannot be changed.
Deleting an employee
- Click the Delete button next to the employee you want to remove
- A confirmation prompt appears — confirm to proceed or dismiss to cancel
- The employee is removed from the list
Deleting an employee is permanent and cannot be undone. However, any members who were assigned to this employee will not lose their records — their detail page will show "Employee no longer exists" in the Employee field instead of the employee's name.
Employee field in Membership
The Employees feature connects directly to the Membership module. Here's how to set it up and use it.
Enabling the Employee field
Before employees can be assigned to members, you need to turn on the Employee field in your Membership settings:
- Navigate to Memberships > Settings and Preferences
- Scroll down to find the Employee field in the member fields list
- Toggle Shown to ON, this makes the Employee field visible in member registration and detail pages
- Optionally toggle Required to ON, this forces staff to select an employee when registering a new member
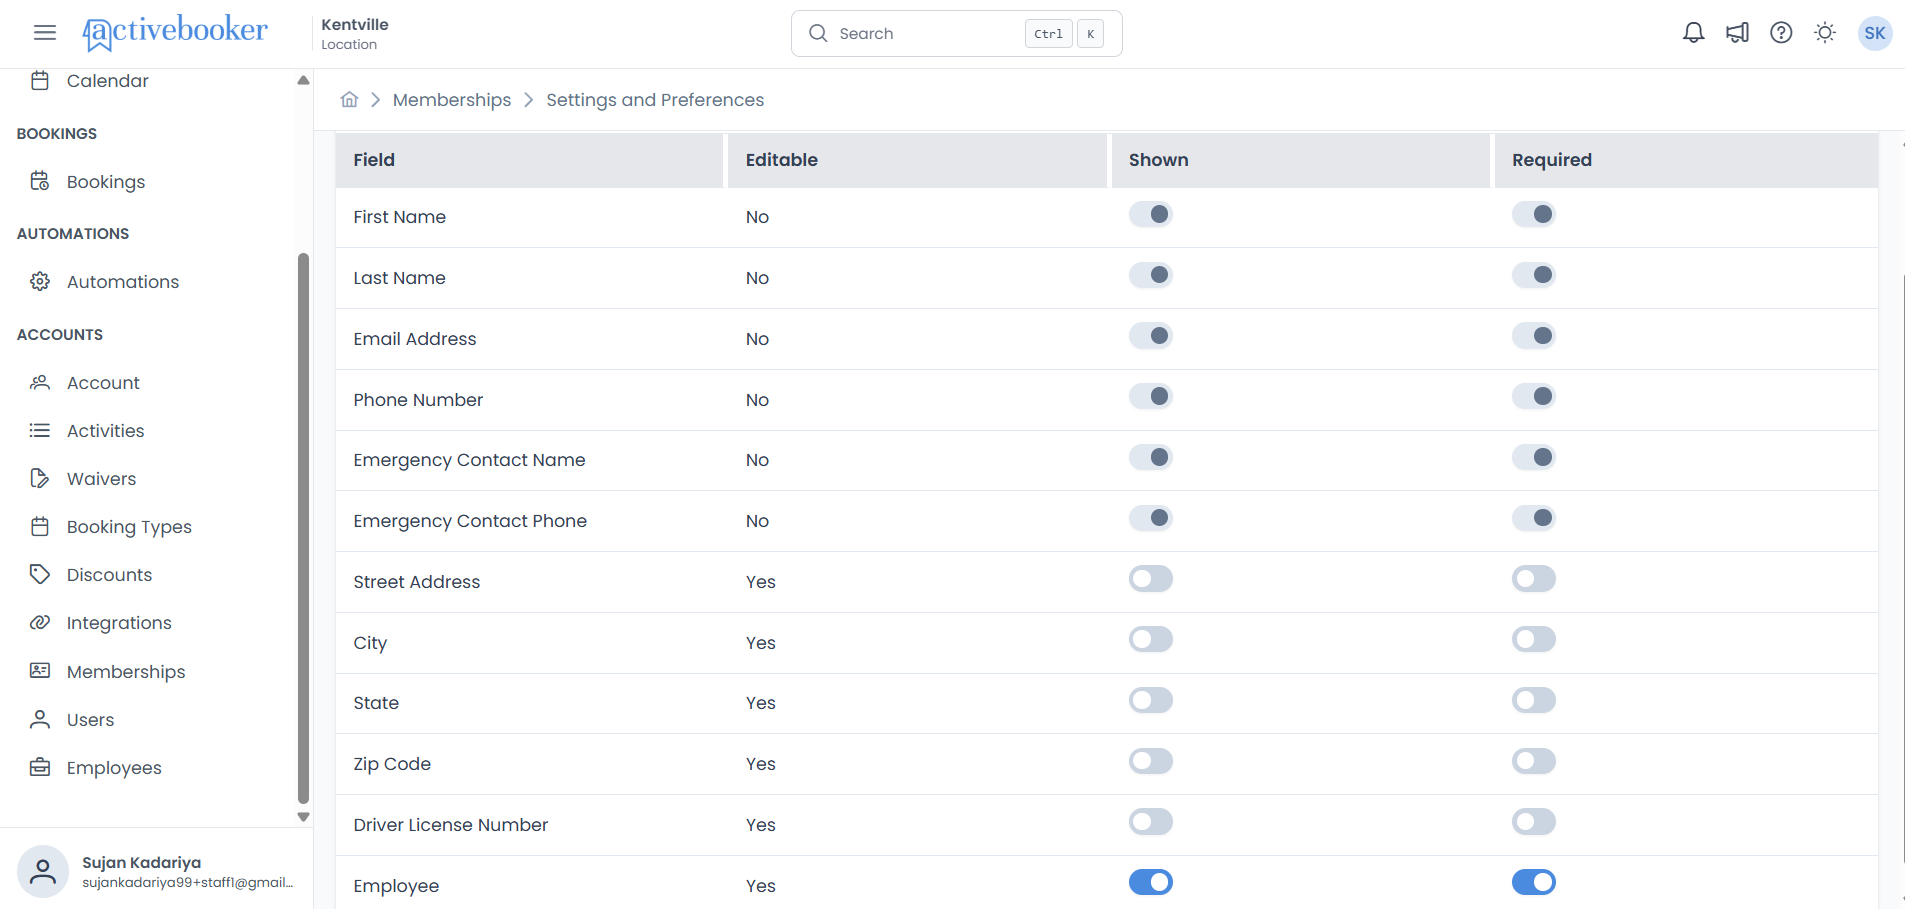
Default settings: For both new and existing locations, the Employee field appears with Shown and Required both turned OFF by default. You can enable them at any time.
Assigning an employee during member registration
Once the Employee field is enabled (Shown is ON):
- Navigate to Memberships > Members and click + Add Member
- Fill in the member's details (First Name, Last Name, Email, Phone Number, etc.)
- You will see an Employee dropdown in the form
- Click the dropdown to see a list of all active employees
- Use the search box inside the dropdown to quickly find an employee by name
- Select the employee and complete the registration
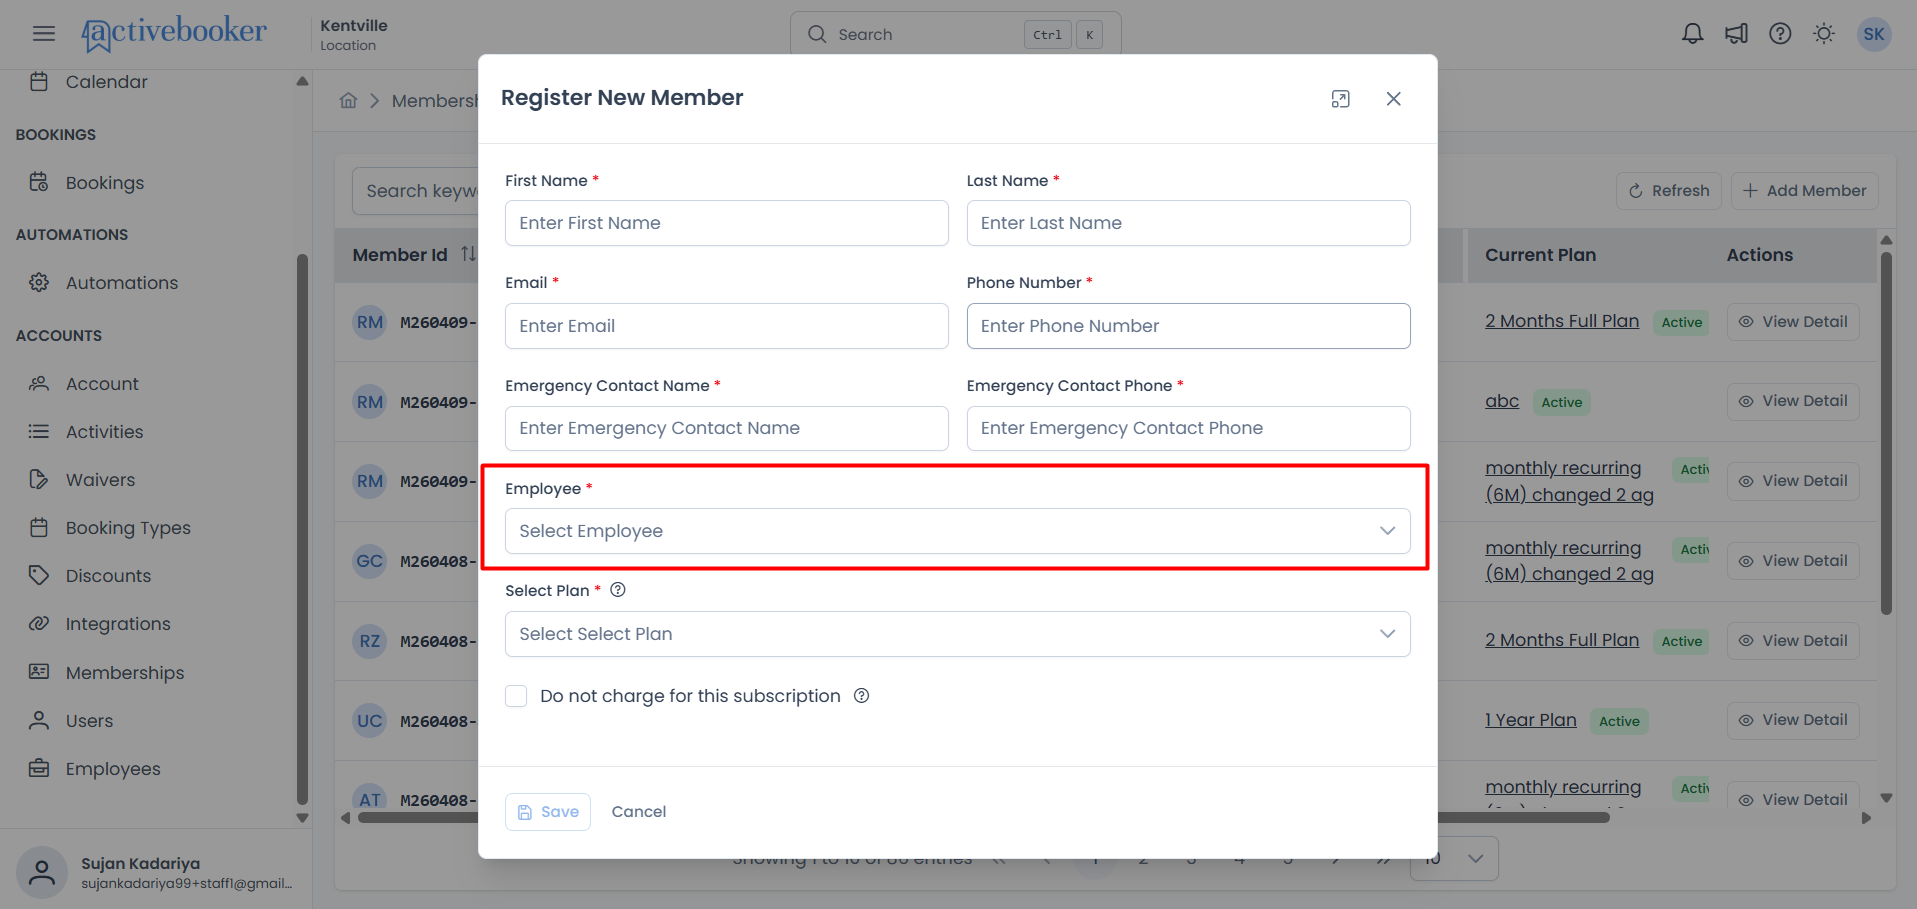
- If Required is ON, you must select an employee before saving
- If Required is OFF, you can leave the Employee field empty
- Only active employees appear in the dropdown
Viewing the assigned employee on a member's profile
After a member has been registered:
- Navigate to Memberships > Members
- Click View Detail on the member you want to check
- In the Member Information section, you'll see an Employee row
The Employee row shows one of the following:
| What you see | What it means |
|---|---|
| An employee's name (e.g., "Jordan Smith") | The member was registered by this employee, and the employee still exists in the system |
| (empty) | No employee was assigned when the member was registered |
| "Employee no longer exists" | An employee was assigned, but that employee has since been deleted from the system |
Editing a member's assigned employee
- Open the member's detail page and click Edit
- The Employee dropdown will show the currently assigned employee
- Select a different employee from the dropdown, or clear the selection
- Click Save to update the assignment
Common scenarios
Scenario 1: Setting up employees for the first time
You've just started using the Employees feature and want to add your team:
- Go to Employees in the left sidebar
- Click + Add Employee for each staff member
- Enter their first name, last name, and email (optional)
- Make sure the Is Active checkbox is checked
- Click Save and repeat for each team member
- Next, go to Memberships > Settings and Preferences
- Toggle the Employee field's Shown switch to ON
- Toggle Required to ON if you want every new member to have an employee assigned
Scenario 2: Tracking which employee registered the most members
Want to see who on your team is bringing in the most sign-ups:
- Go to Memberships > Members
- Open individual member profiles by clicking View Detail
- Check the Employee row under Member Information to see who registered each member
- Use this information to recognize and reward your top-performing team members
Scenario 3: An employee leaves your team
When a staff member is no longer part of your team:
- Option A — Deactivate: Edit the employee and uncheck Is Active. They will no longer appear in dropdowns for new registrations, but their name stays on existing member records.
- Option B — Delete: Delete the employee entirely. Members they registered will show "Employee no longer exists" on their profile. The member records themselves are not affected.
If you want to preserve the employee's name on existing member records, deactivating is recommended over deleting.
Best practices
✓ Add all team members before enabling the field — Make sure your employee list is complete before you turn on the Required toggle, so staff always have someone to select
✓ Deactivate instead of deleting — When an employee leaves, set them to Inactive rather than deleting. This preserves their name on existing member records
✓ Keep information up to date — Update employee names and emails if they change, so your records stay accurate
✓ Use the Required toggle wisely — Turn Required ON if it's important to always know who registered a member. Leave it OFF if employee assignment is optional for your workflow
✗ Avoid deleting employees with many member assignments — Deleting replaces their name with "Employee no longer exists" on all associated member profiles
✗ Don't leave the Employee field hidden if you need tracking — The field must be set to Shown for it to appear during member registration
Troubleshooting
I don't see the Employee field when registering a member
Why this happens: The Employee field is hidden by default in Membership settings.
How to fix it:
- Go to Memberships > Settings and Preferences
- Find the Employee row in the member fields list
- Toggle Shown to ON
The Employee dropdown shows no options
Why this happens: Either no employees have been added, or all employees are set to Inactive.
How to fix it:
- Go to Employees in the left sidebar
- Add new employees using the + Add Employee button, or
- Edit existing employees and check the Is Active checkbox
A member's profile shows "Employee no longer exists"
Why this happens: The employee who was originally assigned to this member has been deleted from the system.
What to do: This is expected behavior, the member's record is unaffected. If needed, you can edit the member and assign a different active employee.
I can't find a specific employee in the list
Why this happens: You may be looking at a filtered or sorted view.
How to fix it:
- Clear the Search keyword field to show all employees
- Check that you're looking at the correct page (use pagination at the bottom)
- Click Refresh to reload the latest data
Frequently asked questions
Can I change an employee's code?
No. The Employee Code is automatically generated by the system when an employee is created and cannot be modified. It serves as a unique identifier for each employee.
What happens to member records when I delete an employee?
The member records stay exactly as they are. The only change is that the Employee field on affected member profiles will display "Employee no longer exists" instead of the employee's name.
Can I assign an employee to an existing member?
Yes. Open the member's detail page, click Edit, and select an employee from the dropdown. Make sure the Employee field is set to Shown in Memberships > Settings and Preferences.
Do inactive employees still show on member profiles?
Yes. If a member was registered by an employee who is now inactive, the employee's name will still appear on the member's profile. Inactive status only hides the employee from dropdown selections when registering or editing members.
Can multiple members be assigned to the same employee?
Yes. There is no limit to how many members can be assigned to a single employee. This is expected — an active sales team member may register many new members over time.
Related resources
Learn more about related features and capabilities:
- Users — Managing dashboard users and their access permissions
- Memberships — Setting up and managing membership plans and members
- Account Settings — Configuring your overall account preferences