Settings and Preferences
Configure how your member portal appears to potential customers and control membership system behavior. These settings help you create a welcoming, branded experience for people exploring your membership options.
Quick start
Access and update your membership settings in three steps:
- Navigate to Memberships > Settings and Preferences in the sidebar
- Review the current settings in the General Settings and Member Portal UI Preference sections
- Click the Edit button on any section to modify the settings
Changes to these settings affect how your member portal appears to potential customers and how the membership system operates.
What you can do
Membership Settings and Preferences help you:
- Customize member portal text — Create welcoming titles and descriptions for your membership sign-up page
- Set tax rates — Configure the tax percentage applied to membership purchases
- Control waiver requirements — Decide whether members must sign waivers before accessing services
- Manage member portal access — Access the URLs where customers can sign in or sign up
Understanding the Settings Page
When you navigate to Memberships > Settings and Preferences, you'll see two main sections:
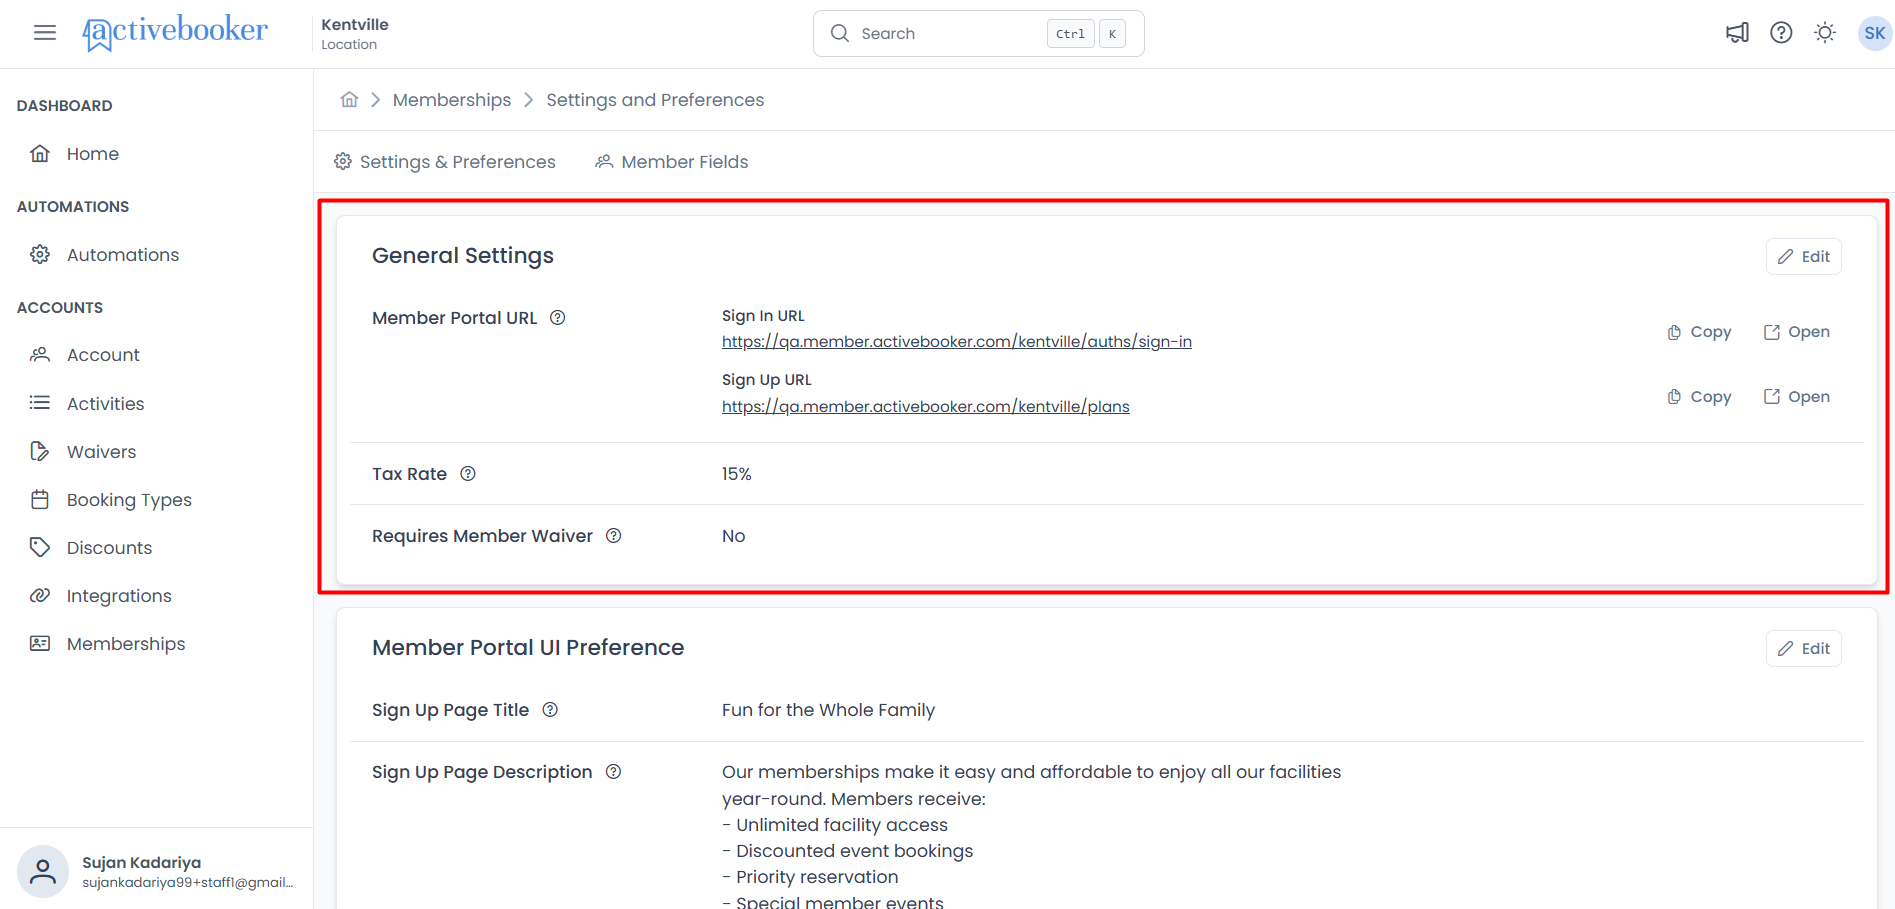
General Settings
Controls operational aspects of your membership system including:
- Member Portal URLs — Links where customers sign in or sign up for memberships
- Tax Rate — The percentage of tax applied to membership fees
- Requires Member Waiver — Whether members must complete a waiver
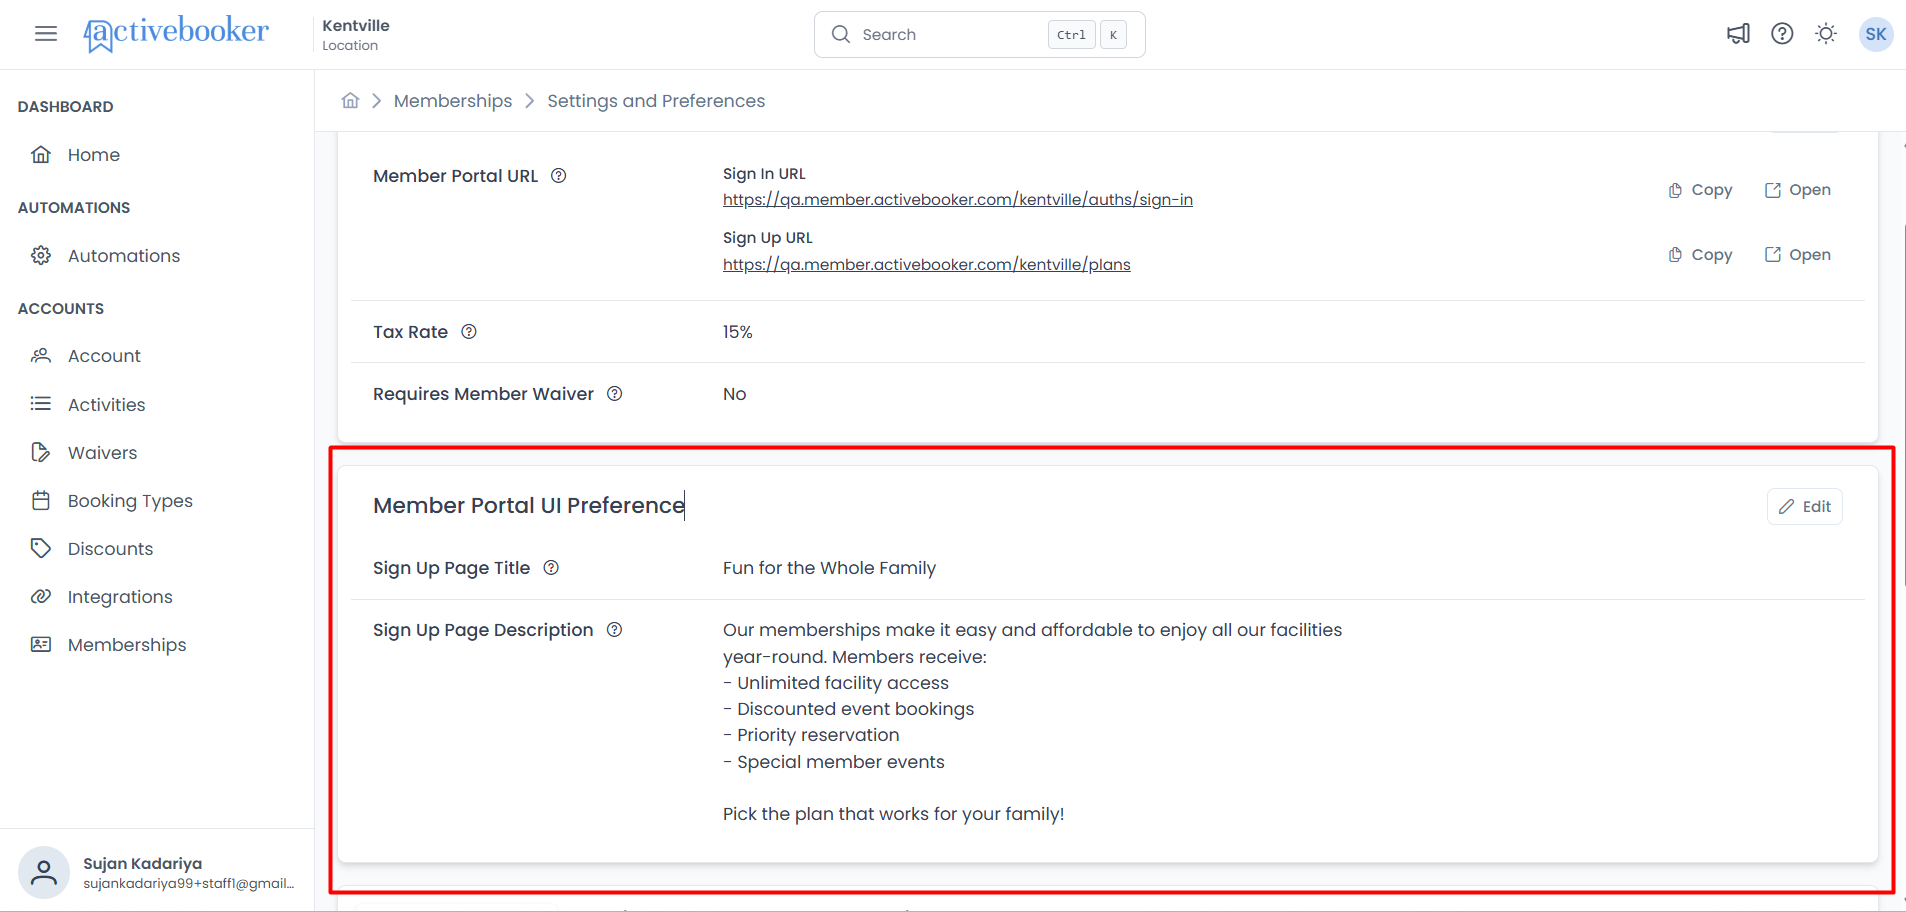
Member Portal UI Preference
Customizes the visual appearance and messaging on your member portal sign-up page:
- Sign Up Page Title — The headline customers see when viewing available plans
- Sign Up Page Description — Supporting text that explains membership benefits
General Settings
Configure essential settings for your member portal, including the portal URL, tax rates, and waiver requirements for new members.
Member Portal URL
The unique web addresses where customers can access your membership portal.
Sign In URL
The page where existing members log in to access their account, view their subscription, and manage their membership.
Format: https://qa.member.activebooker.com/[updated-url]=[updated]/auths/sign-in
What customers see:
- Login form with email and password fields
- Option to reset forgotten passwords
- Link to sign up page for new members
Sign Up URL
The page where potential customers view available membership plans and register for a new membership.
Format: https://qa.member.activebooker.com/[updated-url]=[updated]/plans
What customers see:
- List of available membership plans with pricing and features
- Sign-up forms to create new member accounts
- The title and description you configure in Member Portal UI Preference
Click the Copy button next to each URL to copy it to your clipboard. Click Open to view the page in a new browser tab.
Add these URLs to your website, marketing emails, and social media to help customers find and join your memberships easily.
Tax Rate
The percentage of tax applied to membership purchases.
Value: Displayed as a percentage (e.g., 15%)
This tax rate is automatically calculated and added to membership fees when customers purchase or renew subscriptions.
Example: If a membership plan costs $50 and the tax rate is 15%, the customer pays $57.50 total ($50 + $7.50 tax).
Requires Member Waiver
Controls whether members must sign a waiver before accessing member benefits or making bookings.
Values:
- Yes — Members must complete and sign a waiver document before they can use member benefits
- No — Members can immediately access benefits without signing a waiver
If you enable waiver requirements, make sure you've configured your waiver content in the Waivers section of your account.
Editing General Settings
- Navigate to Memberships > Settings and Preferences
- Locate the General Settings section
- Click the Edit button in the top-right corner of the section
- The "Edit General Settings" modal opens
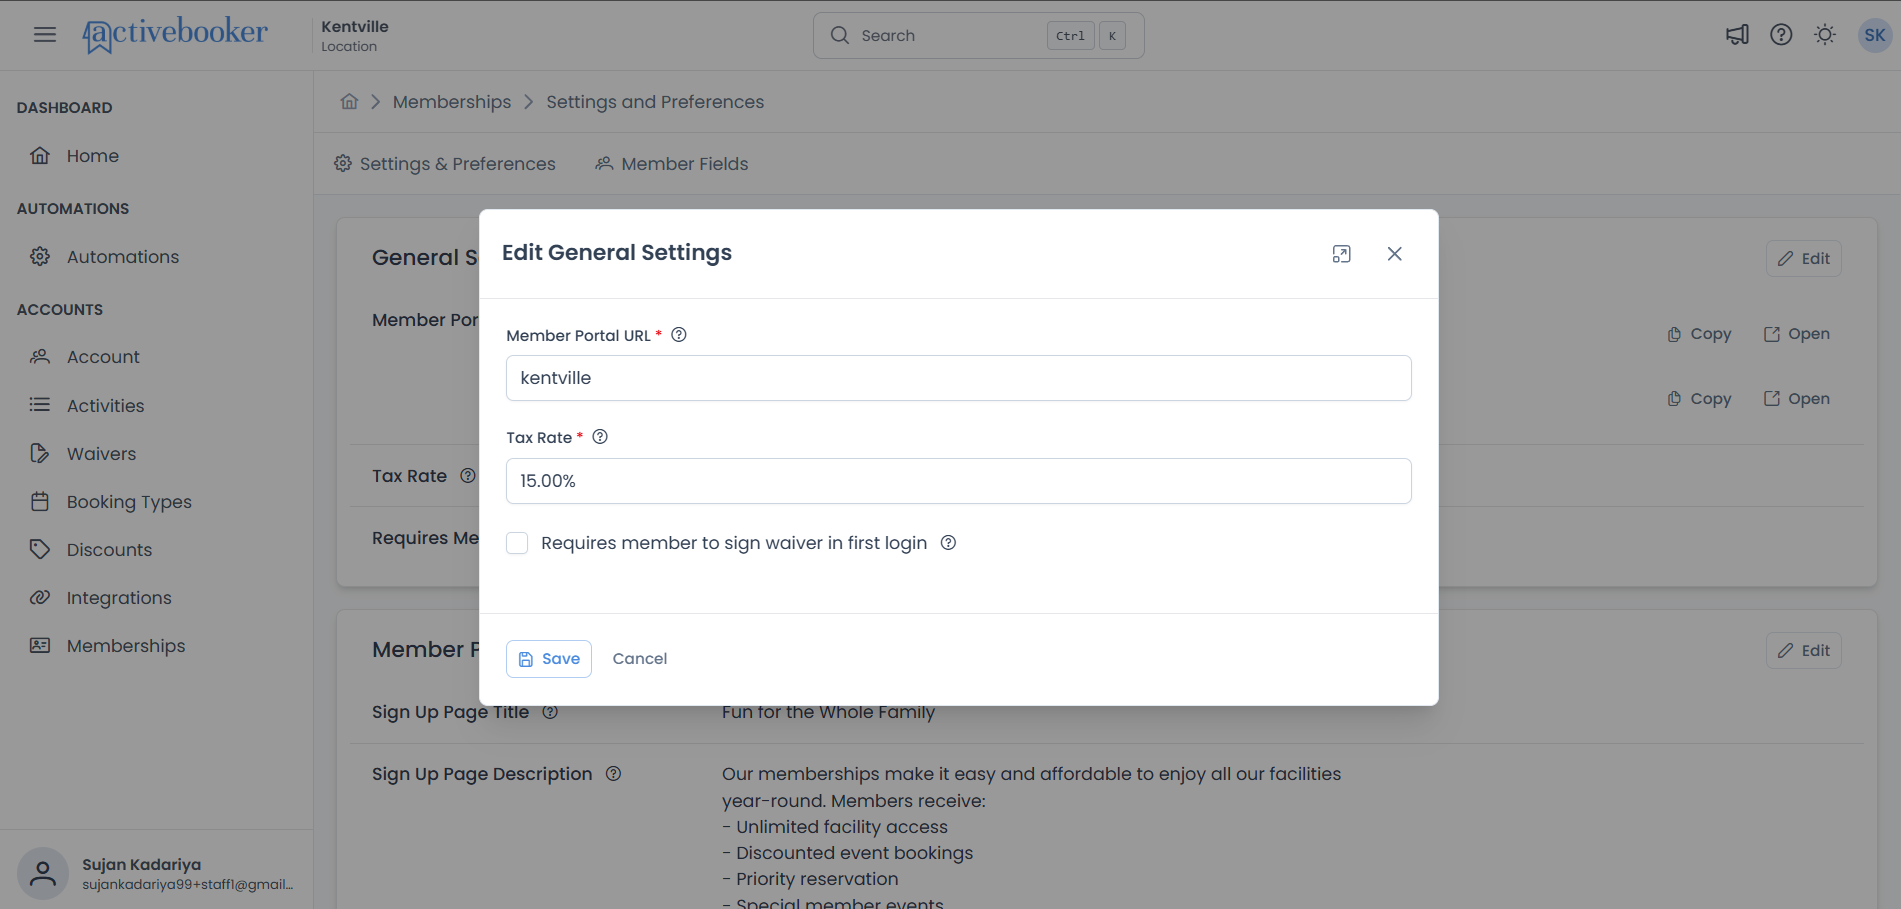
- Update the fields:
- Member Portal URL: Enter your custom portal subdomain (e.g., "kentville")
- Tax Rate: Enter the applicable tax percentage (e.g., "15.00%")
- Requires member to sign waiver in first login: Check this box to require waiver acceptance
- Waiver Text: If waiver is required, enter the waiver text using the rich text editor (supports formatting, lists, and links)
- Click Save to apply your changes, or Cancel to discard them
Member Portal UI Preference
Customize the text that appears at the top of your member portal sign-up page. This is the first thing potential customers see when they're deciding which membership plan to choose.
Sign Up Page Title
The headline displayed at the top of the member portal sign-up page where customers view available membership plans.
Default: "Choose Your Perfect Plan!"
Character limit: 150 characters maximum
Where it appears: At the top of the plans listing page, above all membership plan cards
Purpose: This title sets the tone and expectations for potential members. Use it to create excitement and guide customers toward selecting a plan.
Examples:
- "Choose Your Perfect Plan!"
- "Join Our Community Today"
- "Find the Membership That Fits Your Lifestyle"
- "Start Your Journey With Us"
- "Select Your Membership Level"
- Keep it short and action-oriented
- Make it welcoming and encouraging
- Highlight the benefit of choosing a plan
- Use positive, engaging language
- Test different versions to see what resonates with your audience
Sign Up Page Description
A brief description shown below the title on the sign-up page. Use this space to explain the benefits of membership or provide guidance to customers.
Default: "Discover the best plan that suits your needs and unlock a world of exclusive benefits and features. Start your journey with us today and experience all the advantages that come with being a member!"
Character limit: 600 characters maximum
Where it appears: Directly below the Sign Up Page Title, above the membership plan cards
Format: Supports line breaks for better readability
Purpose: This description provides context and motivates potential members to explore your plans. Explain what makes your memberships valuable and what customers can expect.
- Lead with the most important benefits
- Use line breaks to organize information clearly
- Include specific perks when possible (discounts, priority access, etc.)
- Keep the tone conversational and friendly
- End with a call-to-action that encourages plan selection
Editing Member Portal UI Preference
Update your sign-up page text
- Navigate to Memberships > Settings and Preferences
- Locate the Member Portal UI Preference section
- Click the Edit button in the top-right corner of the section
- The "Edit Member Portal UI Preference" modal opens
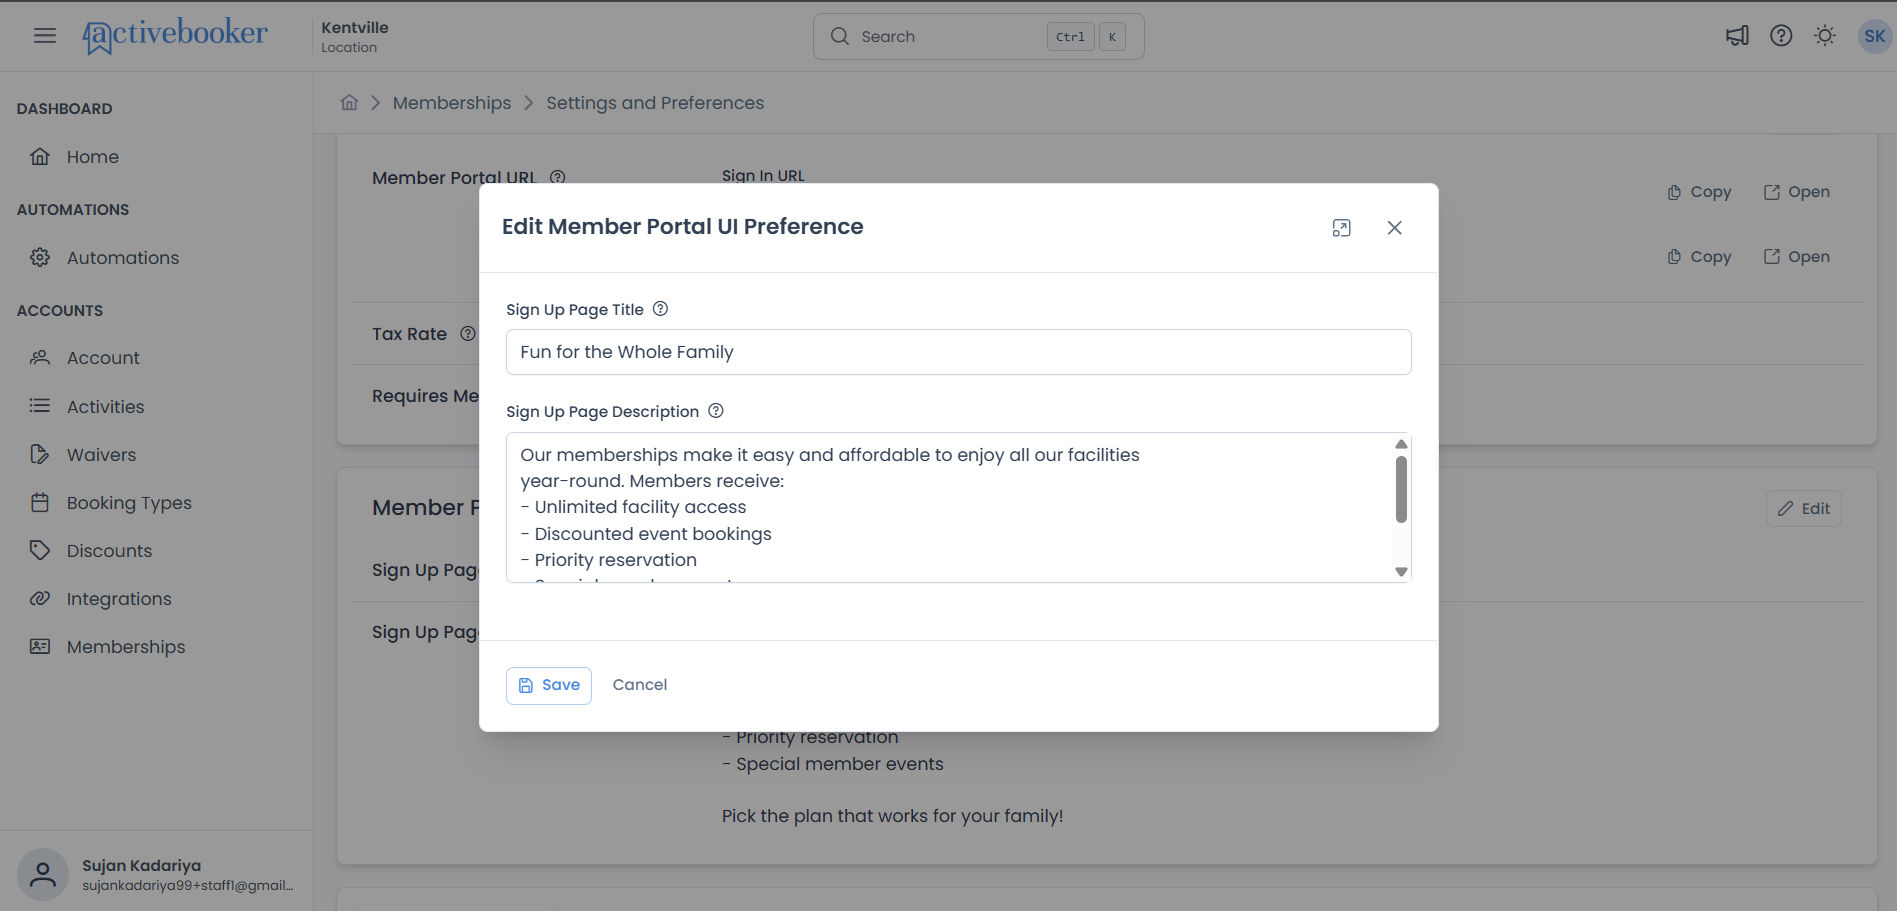
- Update the fields:
- Sign Up Page Title: Enter your new headline (up to 150 characters)
- Sign Up Page Description: Enter your new description (up to 600 characters)
- Click Save to apply your changes, or Cancel to discard them
Both fields are optional. If you leave them empty, the system will use the default values shown above.
Character counters
As you type in each field, you'll see a character counter showing how many characters you've used and how many remain:
Sign Up Page Title: 0/150 updates as you type
Sign Up Page Description: 0/600 updates as you type
This helps you stay within the limits and craft concise, effective messaging.
Preview your changes
After saving, your new title and description appear immediately:
- In the Member Portal UI Preference section of the Settings page
- On your live member portal sign-up page when customers visit
After making changes, click Open next to the Sign Up URL in General Settings to view your member portal and see how your new text looks to customers.
Best Practices
Configuring your general settings effectively
✅ Choose a memorable portal URL — Use your business or location name for easy recall (e.g., "kentville" or "yogastudio")
✅ Set accurate tax rates — Ensure the tax rate matches your local tax requirements to avoid pricing errors
✅ Use waivers when necessary — Enable waiver requirements for activities with physical risk or liability concerns
✅ Keep waiver text clear — Write waivers in plain language that members can easily understand
❌ Avoid complex portal URLs — Keep it short and simple; avoid special characters or confusing terms
❌ Don't skip waiver updates — Outdated waiver text may not provide adequate legal protection
Creating compelling sign-up page content
✅ Know your audience — Write for the specific people you want to attract as members
✅ Highlight benefits, not features — Instead of "Monthly billing," say "Flexible monthly payments"
✅ Use clear, simple language — Avoid jargon or complex terminology that might confuse potential members
✅ Create urgency (when appropriate) — Phrases like "Start today" or "Join now" encourage action
✅ Test different versions — Try various titles and descriptions to see what converts best
❌ Avoid all caps — It feels like shouting and can be off-putting
❌ Don't over-promise — Be honest about what memberships include
❌ Skip negative language — Focus on what members gain, not what they avoid
Testing your configuration
- Save your changes in the dashboard
- Open the Sign Up URL to view the live member portal
- Review both the sign-up page content and portal functionality
- If waivers are enabled, complete a test sign-up to verify the waiver appears correctly
- Check pricing displays the correct tax rate
- Make adjustments as needed
Updating for seasons or campaigns
Consider updating your Member Portal UI Preference for:
Seasonal promotions:
"Spring Special: Join Now and Save!"
New member campaigns:
"Welcome new members! Select your plan and get started today."
Holiday periods:
"Give the gift of membership this holiday season!"
Community milestones:
"Celebrating 1,000 members! Join our growing community."
Examples and Templates
Example 1: Golf Club
Title: "Tee Off with Membership Benefits"
Description:
Join our community of golf enthusiasts and enjoy exclusive access to our
pristine course. Members save on every round, receive priority tee times,
and participate in member tournaments. Explore our plans and find the
perfect fit for your game.
Example 2: Recreation Center
Title: "Fun for the Whole Family"
Description:
Our memberships make it easy and affordable to enjoy all our facilities
year-round. Members receive:
- Unlimited facility access
- Discounted event bookings
- Priority reservation
- Special member events

Pick the plan that works for your family!
Example 3: Bowling Alley
Title: "Bowl More, Save More"
Description:
Discover the convenience of membership pricing! Our plans offer
significant savings for individuals, families, and groups. Members
enjoy discounted lane rates, free shoe rentals, and access to
exclusive member events. Select your plan below!
Troubleshooting
Portal URL not working
Symptoms: The member portal URL returns an error or doesn't load
Solutions:
- Verify the portal URL contains only letters, numbers, and hyphens (no spaces or special characters)
- Ensure the URL is unique and not already in use
- Try accessing both the Sign In and Sign Up URLs from the settings page
- Contact support if the URL continues to fail
Waiver not appearing for new members
Symptoms: New members can log in without seeing or signing the waiver
Solutions:
- Confirm the "Requires member to sign waiver in first login" checkbox is enabled
- Verify that waiver text has been entered in the Waiver Text field
- Test with a new member account (existing members won't see the waiver again)
- Check that changes were saved successfully
Changes not appearing on member portal
Symptoms: Updated title or description doesn't show on the sign-up page
Solutions:
- Verify you clicked Save after making changes
- Clear your browser cache and refresh the member portal page
- Open the sign-up page in a private/incognito browser window
- Wait a few seconds and refresh again (changes may take a moment to propagate)
Default text is showing instead of custom text
Symptoms: The default title/description appears even after you've saved custom text
Solutions:
- Verify you're viewing the correct member portal (check the URL)
- Confirm your changes were saved successfully (check for success message)
- Look for any error notifications that might have appeared during save
- Try editing and saving again
- Contact support if the issue persists
Related Topics
- 📚 Membership Plans — Create and configure membership offerings that appear on the sign-up page
- 👥 Members — Manage member accounts and subscriptions
- 📂 Membership Categories — Organize plans into logical groups
- 🏠 Membership Management Overview — Understand the complete membership system
- 📄 Waivers — Configure member waiver requirements and content