Membership Plan Details
View and manage detailed information for individual membership plans. The plan details page provides a comprehensive view of a specific plan's configuration, including general information, pricing, and rules that govern member access.
Quick start
Access a plan's details in just a few steps:
- Navigate to Memberships > Membership Plans in your dashboard sidebar
- Locate the plan you want to view in the list
- Click View Detail in the row action menu
- Review the General Information and other sections
What you can do
The Plan Details page helps you:
- View plan configuration — See all settings and rules for a specific membership plan
- Edit general information — Update name, description, category, and visibility settings
- Control member capacity — Set limits on how many members can subscribe to the plan
- Manage availability — Activate or deactivate plans, make them private or featured
- Configure booking rules — Define how members on this plan can book services (Coming Soon)
Understanding the interface
When you open a plan's details, you'll see a page with tabs providing access to different configuration areas.
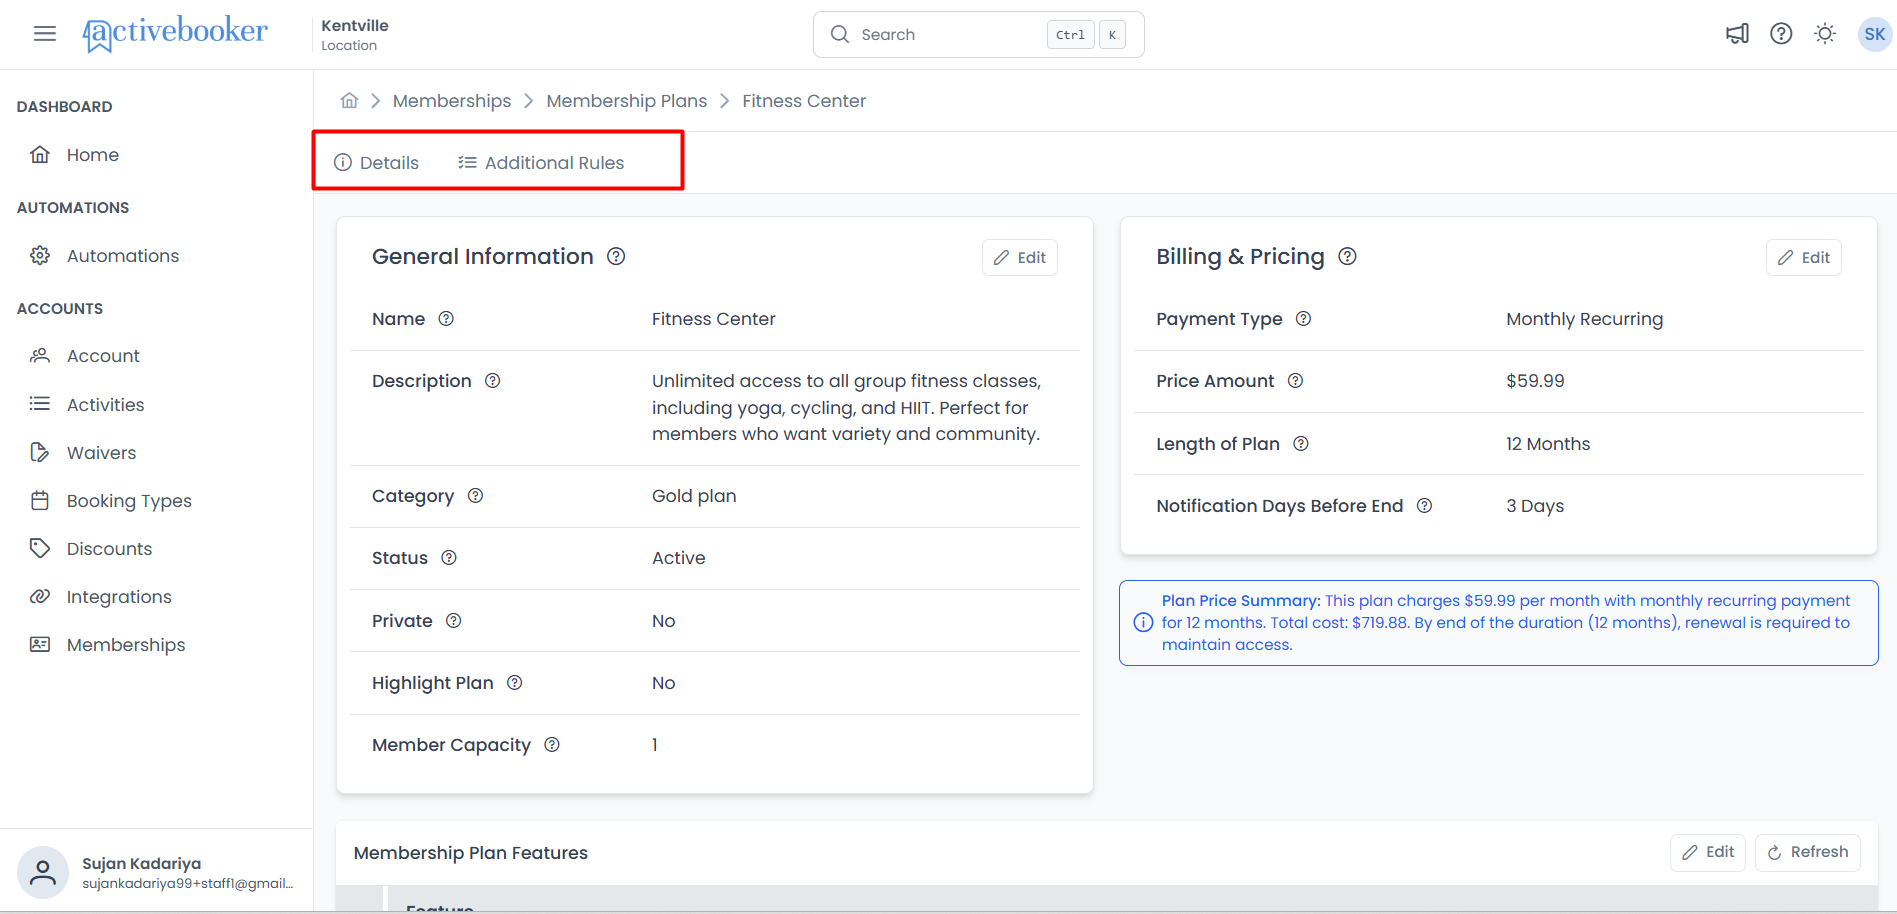
Available Tabs
| Tab | What It Contains |
|---|---|
| Details | General Information about the plan including name, description, category, status, visibility settings, and member capacity |
| Additional Rules | Booking rules, limits, and member access controls (Coming Soon) |
The Details tab opens by default when you access a plan's details page.
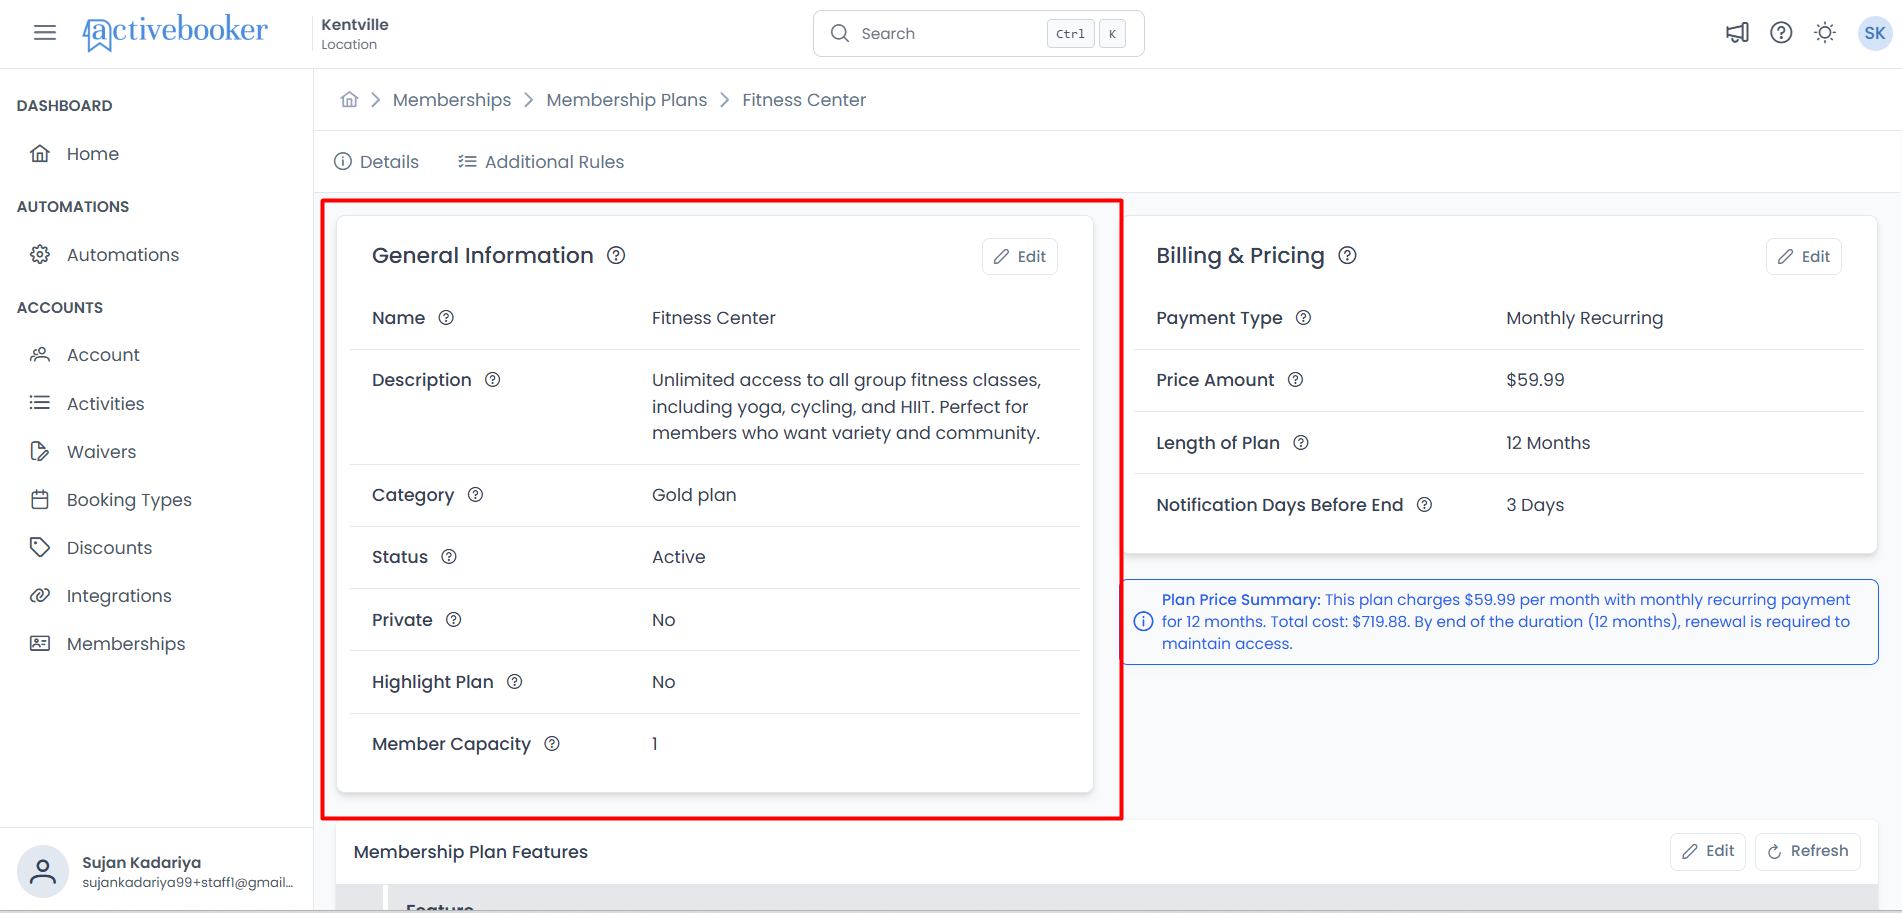
General Information Section
The General Information section displays core details about your membership plan. These settings control how the plan appears to customers and how it behaves within your membership system.
Accessing General Information
- Navigate to Memberships > Membership Plans
- Find the plan you want to view
- Click View Detail in the Actions column
- The Details tab opens automatically showing the General Information section
What General Information Displays
The General Information section shows the following details:
Name
The display name for this membership plan as it appears to customers when viewing available membership options.
Description
A detailed explanation of what this membership plan offers. This description helps customers understand the plan's purpose and benefits.
Category
The category this membership plan belongs to. Categories help organize plans for easier management and customer browsing.
Status
Shows whether the plan is Active or Inactive. Active plans are visible and purchasable by customers. Inactive plans remain in the system but are hidden from customers.
Private
Indicates whether the plan is private. When set to Yes, customers cannot purchase this plan unless they are directly invited or granted access. Use this for exclusive or VIP memberships. When set to No, the plan is publicly available (if Active).
Highlight Plan
Shows whether this plan is featured. Featured plans appear more prominently to customers when browsing membership options. Only one plan should typically be marked as featured.
Member Capacity
The maximum number of active members that can subscribe to this plan. If set, displays the limit number. If not set, this field is empty indicating unlimited capacity.
Hover over the info icon (ⓘ) next to any field label to see detailed explanations about what that setting controls.
Editing General Information
Update your plan's core settings to reflect changes in your membership offerings or business needs.
How to Edit General Information
- Navigate to the plan's Details page (see Accessing General Information above)
- Click the Edit button in the top-right corner of the General Information section
- The "Edit General Information" modal dialog opens
- Update the fields you want to change (see field details below)
- Click Save to apply your changes, or Cancel to discard them
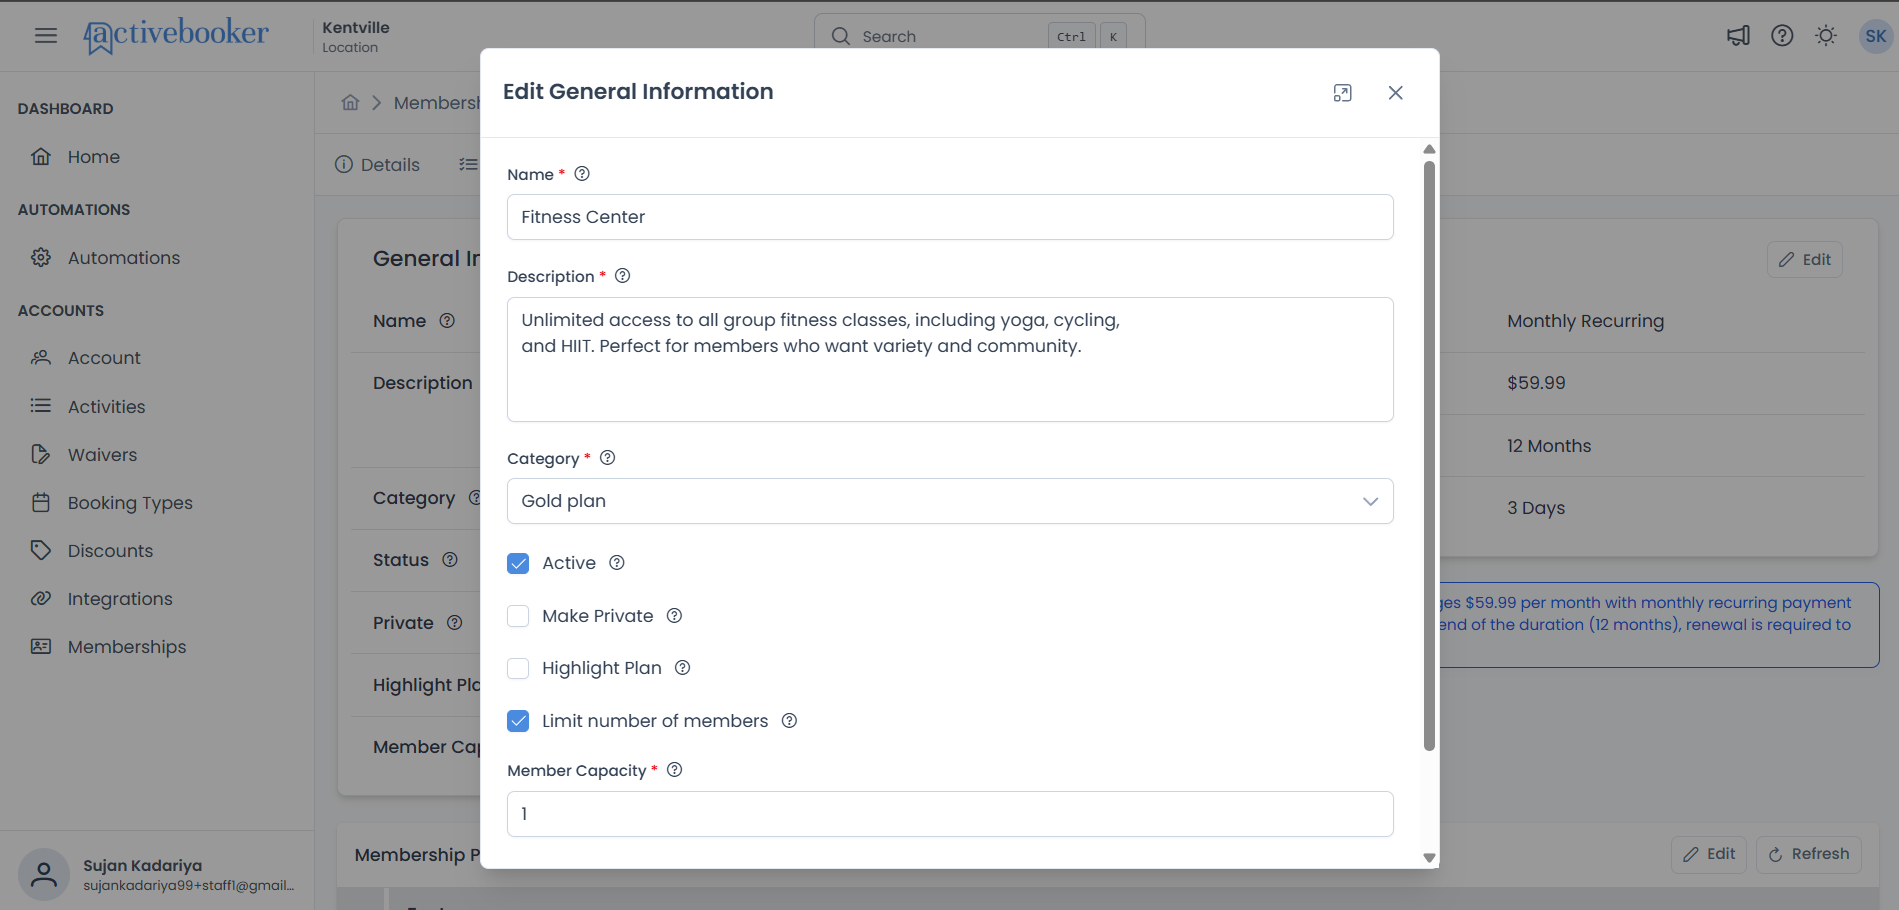
Name, Description, and Category are required fields. You must provide values for these before saving.
Name Field
The display name for this membership plan.
- Uniqueness: Plan names should be distinct to avoid customer confusion
- Examples: "Monthly Basic", "Annual Premium", "Family of 4", "VIP Access"
- Use clear, descriptive names that immediately communicate the plan's value
- Include duration if it helps differentiate plans (e.g., "Monthly" vs "Annual")
- Avoid technical jargon or internal codes
- Keep it short and memorable
Description Field
A detailed explanation of what this membership plan offers.
- Purpose: Helps customers understand the plan's purpose and benefits at a glance
Examples:
Fitness Center:
Unlimited access to all group fitness classes, including yoga, cycling,
and HIIT. Perfect for members who want variety and community.
Recreation Center:
Family plan covering up to 4 members with discounted rates on all
activities and priority booking for special events.
- Lead with the most important benefit
- Use specific numbers when possible (e.g., "10 classes" instead of "multiple classes")
- Highlight what makes this plan unique
- Keep language simple and customer-focused
- Mention key perks or restrictions
Category Field
The category this membership plan belongs to.
- Options: Shows all active membership categories you've created
- Purpose: Categories help organize plans for easier management and customer browsing
If you don't see the category you need, you'll need to create it first in Memberships > Membership Categories before assigning it to a plan.
Active Checkbox
Controls whether customers can see and purchase this membership plan.
- Checked: Plan is active and available for new sign-ups
- Unchecked: Plan is inactive and hidden from customers
What happens when Active:
- Plan appears on your public membership portal
- Customers can view and purchase this plan
- Plan appears in member sign-up flows
What happens when Inactive:
- Plan is hidden from public membership listings
- Existing members on this plan are not affected
- Plan remains in your dashboard for management
- You can reactivate it at any time
- Seasonal plans during off-season
- Plans you're phasing out but want to keep for existing members
- Testing new plans before making them public
- Temporarily stopping new sign-ups while at capacity
Make Private Checkbox
Controls whether the plan requires special access to purchase.
- Checked: Plan is private and requires invitation or special access
- Unchecked: Plan is publicly available (if Active)
What happens when Private:
- Plan does not appear in public membership listings
- Only customers with direct invitations can see and purchase it
- Useful for exclusive, VIP, or custom arrangements
When to use Private plans:
- Corporate partnerships with negotiated rates
- VIP or exclusive memberships
- Grandfathered plans for existing members only
- Special arrangements that shouldn't be publicly advertised
- Testing new plans with select customers
- Private plans are available but hidden from public view
- Inactive plans are completely unavailable for purchase
- A plan can be both Private and Active, or Private and Inactive
Highlight Plan Checkbox
Marks this plan as featured or recommended.
- Checked: Plan appears more prominently to customers
- Unchecked: Plan appears normally alongside other plans
Visual impact:
- Featured plans may display with special badges, highlights, or positioning
- Helps guide customers toward your recommended option
- Typically used for your most popular or best-value plan
Only one plan should typically be marked as featured within each category. Multiple featured plans can confuse customers about which is truly recommended.
When to highlight a plan:
- Your most popular membership option
- Best value or recommended plan for new members
- Limited-time special offers
- Plans you want to promote more aggressively
Limit Number of Members Checkbox
Controls whether you want to cap the total number of active subscribers on this plan.
- Checked: Member capacity field appears, and you can set a limit
- Unchecked: Plan allows unlimited members (capacity field is hidden)
Why limit members:
- You have physical capacity constraints (e.g., only 20 lockers available)
- Creating exclusivity for premium plans
- Managing resource allocation across different plan types
- Controlling demand during trials or soft launches
Member Capacity Field
The maximum number of active members that can subscribe to this plan.
- Visible only when: "Limit number of members" checkbox is checked
- Minimum value: 1
- Maximum value: 100 (your location's default member capacity)
- What it counts: Only current/active members (expired and canceled subscriptions don't count)
How it works:
- You set the member capacity (e.g., 25)
- As members subscribe, the count increases
- When 25 active members are subscribed, new customers cannot purchase this plan
- When a member cancels or their subscription expires, a spot opens up
- New customers can then subscribe again
Your location has a total member capacity (default: 100 members across all plans). Individual plan capacities cannot exceed this location limit. If you need to increase the location limit, contact your system administrator.
Examples:
Premium Locker Plan:
- Member Capacity: 20 (because you have 20 premium lockers)
- When 20 members subscribe, the plan shows as "Full" or unavailable
VIP Access Plan:
- Member Capacity: 10 (to maintain exclusivity)
- Limited spots create perceived value
No Capacity Limit:
- Uncheck "Limit number of members"
- Plan accepts unlimited subscribers
- Set capacity based on real physical or resource constraints
- Leave some buffer for operational flexibility
- Monitor capacity usage regularly
- Communicate "spots remaining" to create urgency with potential members
After Saving Changes
When you successfully save changes to General Information:
- A success message appears: "General Information updated successfully"
- The modal closes automatically
- The General Information section refreshes with your new values
- Changes take effect immediately throughout the system
Where changes appear:
- On the plan details page (immediately)
- In the membership plans list (after refresh)
- On the public member portal (for Active, non-Private plans)
- In member sign-up flows and forms
Changes to plan settings do not affect existing members' subscriptions. They continue under the terms they originally signed up for. New settings apply only to future sign-ups.
Common Scenarios
Making a Plan Temporarily Unavailable
Scenario: You need to stop accepting new members for this plan but want to keep it for existing subscribers.
Solution:
- Open the plan details page
- Edit General Information
- Uncheck the Active checkbox
- Save changes
- Existing members retain their subscription
- New customers cannot see or purchase the plan
Creating an Exclusive VIP Plan
Scenario: You want to offer a special plan only to customers you personally invite.
Solution:
- Open the plan details page
- Edit General Information
- Check the Active checkbox (plan must be active)
- Check the Make Private checkbox
- Set appropriate Member Capacity if you want to limit spots
- Save changes
- Plan won't appear publicly but you can invite specific customers
Limiting a Premium Plan
Scenario: You have 15 premium lockers and want to ensure only 15 members can subscribe to your Premium Locker Plan.
Solution:
- Open the plan details page
- Edit General Information
- Check Limit number of members
- Set Member Capacity to 15
- Save changes
- When 15 active members subscribe, no more can join until a spot opens
Promoting a Popular Plan
Scenario: You want to highlight your best-value plan to new customers.
Solution:
- Open the plan details page
- Edit General Information
- Check the Highlight Plan checkbox
- Ensure the plan is Active and not Private
- Save changes
- Plan displays prominently on your member portal
Reorganizing Plans into Different Categories
Scenario: You've restructured your categories and need to move plans accordingly.
Solution:
- Open the plan details page
- Edit General Information
- Change the Category dropdown to the new category
- Save changes
- Plan immediately appears under the new category
- Reorder plans within the category using drag-and-drop on the list page
Best Practices
Naming and Descriptions
✅ Be specific and clear — Names and descriptions should immediately communicate value
✅ Use consistent naming patterns — Helps customers compare plans easily
✅ Update descriptions regularly — Keep them current with your actual offerings
✅ Test with real users — Ask potential members if the description makes sense
❌ Avoid jargon — Use language your customers understand
❌ Don't over-promise — Be honest about what the plan includes
Visibility Management
✅ Start with Inactive — Test new plans internally before making them Active
✅ Use Private for special cases — Keep exclusive arrangements separate from public offerings
✅ Monitor featured plans — Only highlight plans you want to actively promote
✅ Communicate changes — Tell existing members if you're phasing out their plan
❌ Don't delete active plans — Deactivate instead to preserve historical data
❌ Avoid too many active plans — Too many choices can overwhelm customers
Capacity Management
✅ Base on real constraints — Set capacity limits that reflect actual resources
✅ Leave some buffer — Don't max out capacity, leave room for operational needs
✅ Monitor regularly — Check how close you are to capacity limits
✅ Communicate scarcity — "Only 3 spots remaining" can encourage sign-ups
❌ Don't set artificial scarcity — Customers notice and it damages trust
❌ Don't forget to update — If you add resources, increase capacity accordingly
Category Organization
✅ Group similar plans — Categories should make logical sense to customers
✅ Keep categories consistent — Don't frequently change plan categories
✅ Balance category sizes — Avoid having one category with many plans and others with few
❌ Don't over-categorize — Too many categories make navigation difficult
❌ Don't use vague category names — Be specific about what differentiates categories
Troubleshooting
Cannot Save Changes
Symptoms: Save button is disabled or form shows validation errors
Solutions:
- Fill in all required fields (Name, Description, Category)
- Verify Name is 50 characters or fewer
- Ensure Description is 250 characters or fewer
- If limiting members, provide a Member Capacity between 1 and 100
- Review any red error messages below form fields
Changes Not Appearing on Member Portal
Symptoms: Updated plan information doesn't show on the public sign-up page
Solutions:
- Verify the plan Active checkbox is checked
- Ensure Make Private is unchecked (unless intentionally private)
- Clear your browser cache and refresh the member portal page
- Open the member portal in a private/incognito browser window
- Wait a few moments and refresh again
Member Capacity Error
Symptoms: Error when trying to set member capacity
Solutions:
- Ensure capacity is between 1 and 100
- Check if you're at or exceeding the location member limit
- Verify you've checked the "Limit number of members" checkbox
- Enter a whole number (no decimals)
Category Not Available in Dropdown
Symptoms: Can't find the category you need when editing
Solutions:
- Create the category first in Memberships > Membership Categories
- Ensure the category is active
- Refresh the page and try again
- Verify you have permission to view and assign categories
Related Topics
- 📚 Membership Plans List — View and manage all membership plans
- 👥 Members — Manage member accounts and subscriptions
- 📂 Membership Categories — Organize plans into logical groups
- 🏠 Membership Management Overview — Understand the complete membership system
- ⚙️ Settings and Preferences — Configure membership system settings